


.svg)
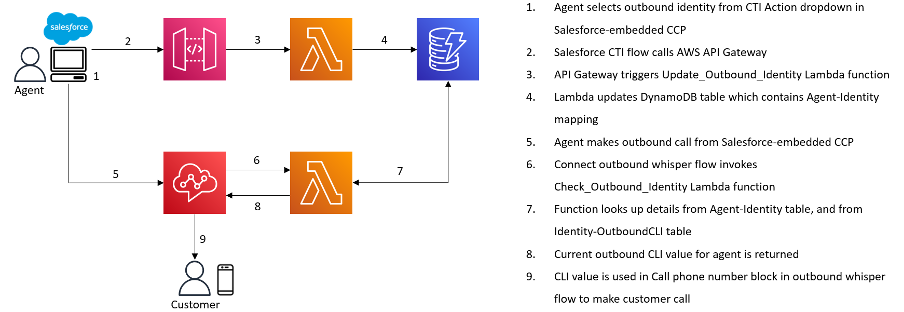
Manual selection of outbound CLI, using the Amazon Connect Salesforce CTI Adaptor
A customer use case we’ve come across a few times now, is to give an agent working in Salesforce the ability to manually select an outbound caller ID from a list, depending on which of their clients they are making a call on behalf of.
Take the example of a BPO organisation, whose agents offer IT Support for multiple clients. If the agent is making a call out to a user at Client A, they want to present a CLI of Client A’s main help desk number. Whereas if they are making a call to a user at Client B, they want to present Client B’s UK Support number.
There are a number of suggested ways of implementing some sort of dynamic outbound CLI out there, for example this post on AWS re:Post - https://repost.aws/knowledge-center/connect-dynamic-outbound-caller-id.
I didn’t find much existing information on enabling this functionality within a Salesforce-integrated environment however, so hopefully this will be helpful for those with that particular use-case.
Overview
For this blog, I’ve put together a PoC of how we can utilise the Salesforce CTI Adaptor in conjunction with API Gateway and a couple of Lambda functions, to enable manual outbound CLI selection.
The agent will be able to manually select an outbound identity option from a dropdown list in the embedded CCP within Salesforce, which will present the associated CLI when making an outbound call.
The components we’ll use are as follows:
· Amazon Connect
· Salesforce (specifically CTI Actions and CTI flows within the Connect CTI Adaptor)
· API Gateway
· Lambda
· DynamoDB
Prerequisites
· An AWS account with access to the services mentioned.
· An Amazon Connect instance, configured and taking inbound/making outbound calls.
· A Salesforce org with the Amazon Connect CTI Adaptor configured, and which you have admin access.
· At least two phone numbers claimed within your Amazon Connect instance, that you can use as outbound CLIs.
· If you want to use custom outbound CLIs as opposed to numbers claimed within your Connect instance, you’ll need to raise a support ticket to enable that. Check out this part of the Connect admin guide - https://docs.aws.amazon.com/connect/latest/adminguide/queues-callerid.html .
Walkthrough
Create Agent-Identity mapping DB table
In AWS, navigate to DynamoDB, and create a new table. Name it (I’ve used ‘Agent_Outbound_Identity’ in the example below) and keep a note of the table name for later.
Add the partition key ‘AgentUsername’, and create the table.
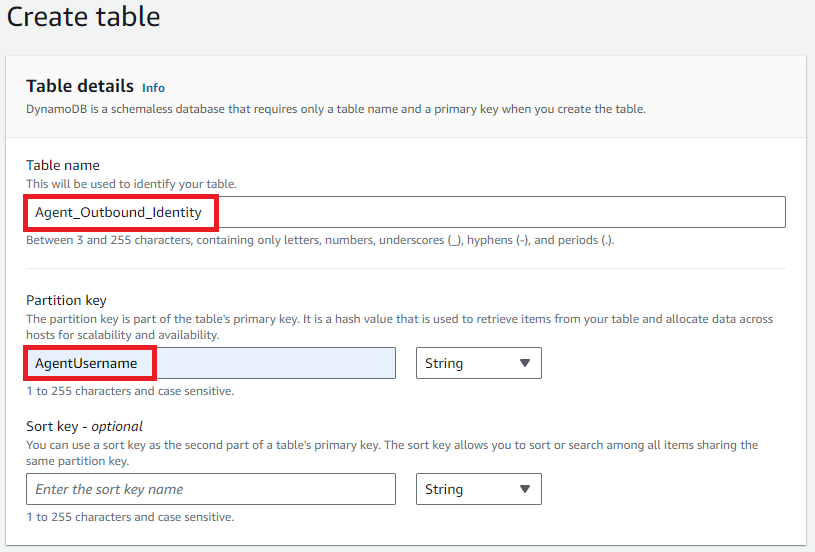
We don’t need to populate anything in this table for the moment, it will get populated automatically by one of the Lambda functions we create later.
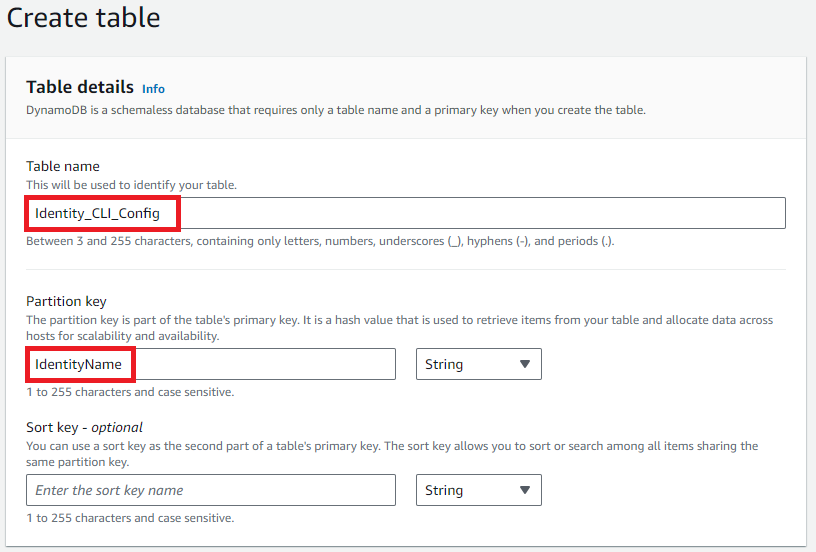
Create Identity - CLI mapping DB table
Create another new DynamoDB table, with your chosen name (I’ve used ‘Identity_CLI_Config’) and keep a note of the table name for later.
Add the partition key ‘IdentityName’ and create the table.
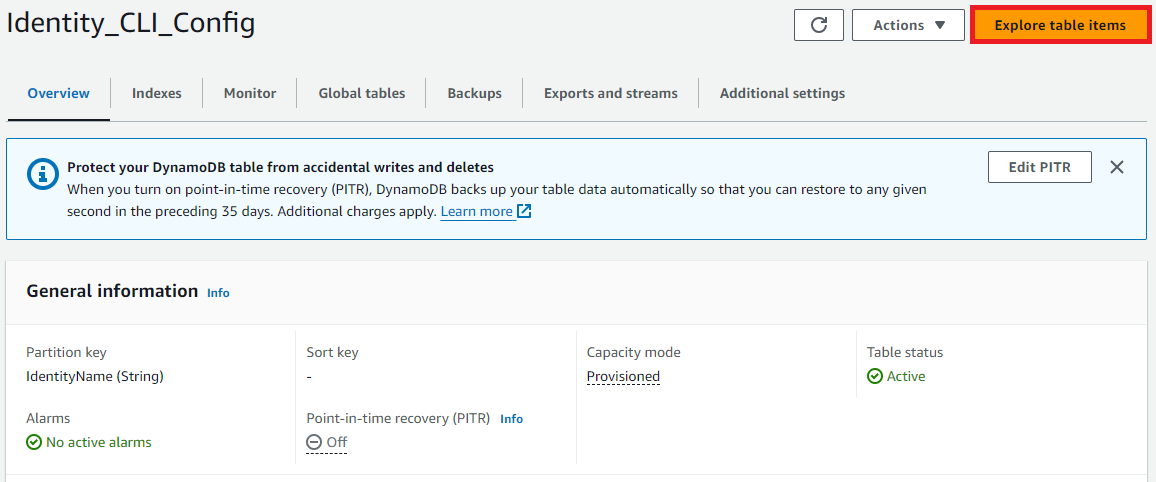
When the table has been created, click into it and click ‘Explore table items.’ We need to add our identities which the agents can select from in the dropdown, and the associated CLIs.
Click ‘Create item.’ Add in the name of the outbound identity, I’ve used ‘Client ABC.’ Then click ‘Add new attribute’, and select ‘String’. In the new field, enter ‘outboundCLI’ as the Attribute name, and your CLI as the value. (Remember that the value will need to be a claimed number within your Connect instance, or you’ll need to have requested it as a custom CLI via a support ticket.)
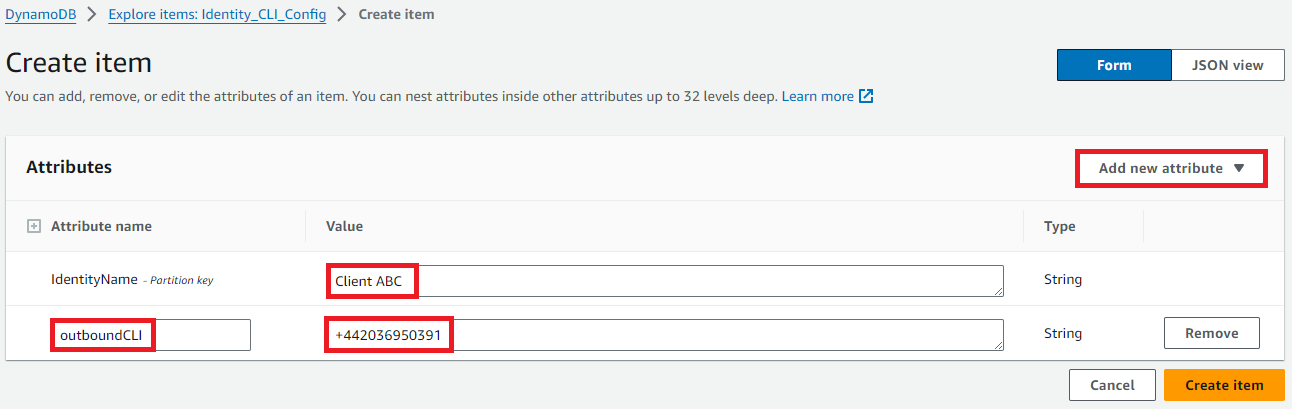
Click ‘Create item’ and verify that it’s created successfully.
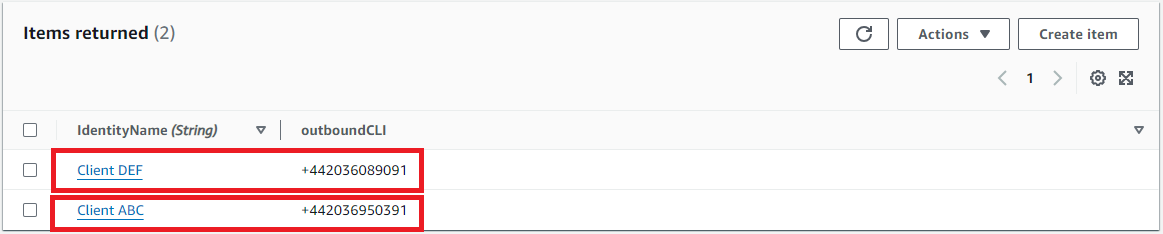
Use the same process to add a second outbound identity with a different phone number for the outbound CLI. I’ve added ‘Client DEF’.
Create Lambda function to update the outbound identity for an agent
Next, we need to add a couple of Lambda functions. The first one will be invoked by API Gateway, which is triggered by an agent choosing an outbound identity from a dropdown in Salesforce, which we will get to shortly.
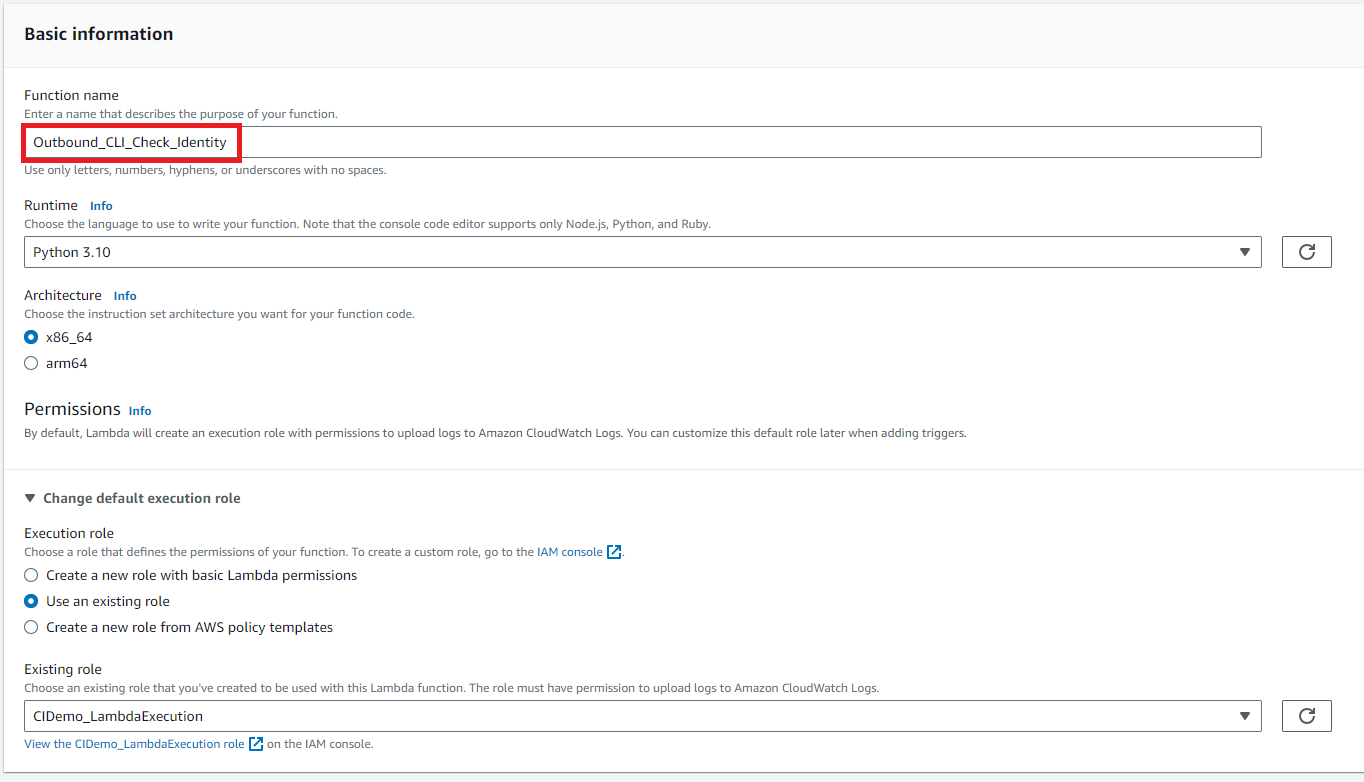
Navigate to the Lambda console, and click ‘Create function’. Give the function a name, I’ve used ‘Outbound_CLI_Update_Identity’. Select ‘Python 3.10’ as the runtime.
Assign a role to the function which allows it to read and update DynamoDB items.
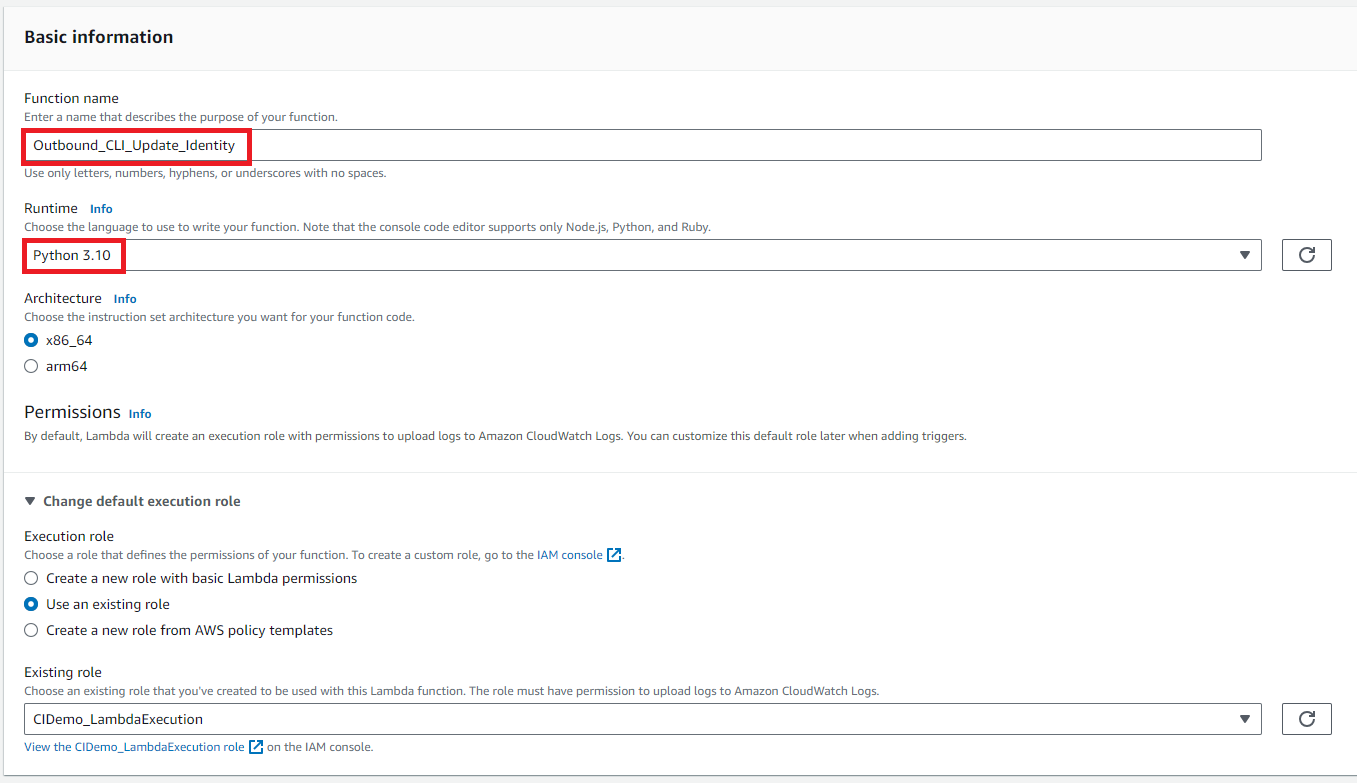
Click ‘Create function’.
Paste the following code into the code editor pane, and then click ‘Deploy’ :
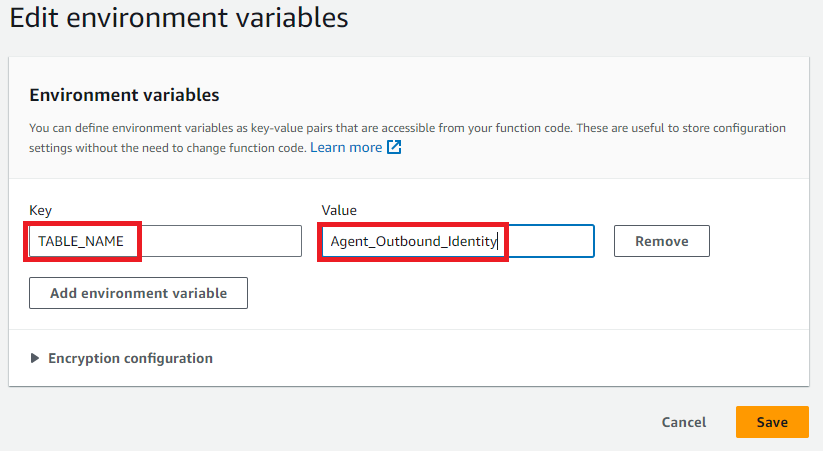
We need to add our DynamoDB table name as an environment variable for the function to refer to.
Go to the ‘Configuration’ tab, then select ‘Environment variables’ from the options on the left hand side. Click ‘Edit.’
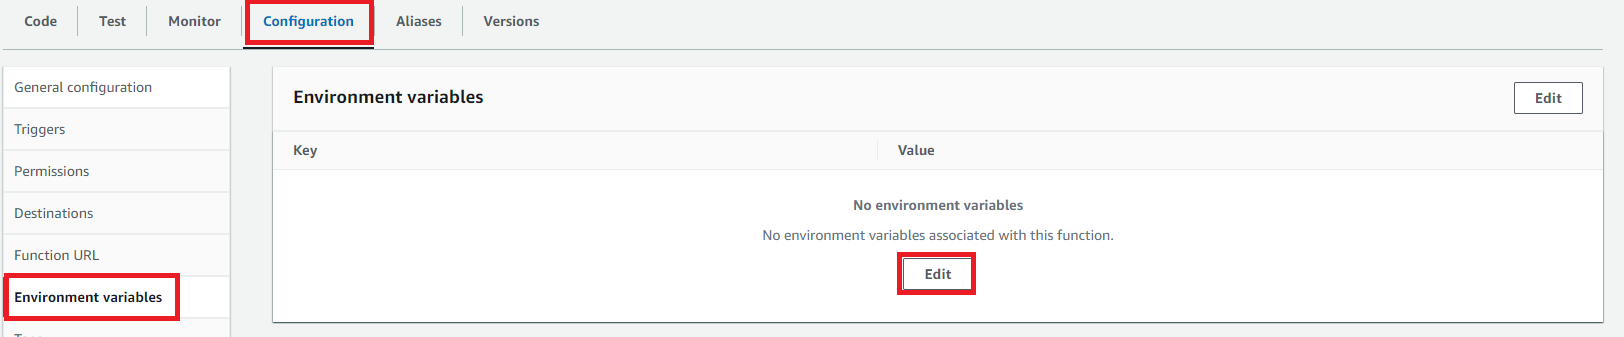
Click ‘Add environment variable’, then add a Key of ‘TABLE_NAME’, and a Value of the name of your table which contains the Agent-Identity mapping. Click ‘Save’.
Create Lambda function to check the agent’s current outbound identity
While we are in Lambda, we are going to add our second Lambda function. This one will be used in the outbound contact flow we’ll set up later. It will check which outbound identity is currently set for the agent making the call.
Create another new Lambda function using Python 3.10 as the runtime, and ensure it has sufficient permissions to read DynamoDB items.
Click ‘Create function’.
Paste the following code into the editor, and click ‘Deploy.’
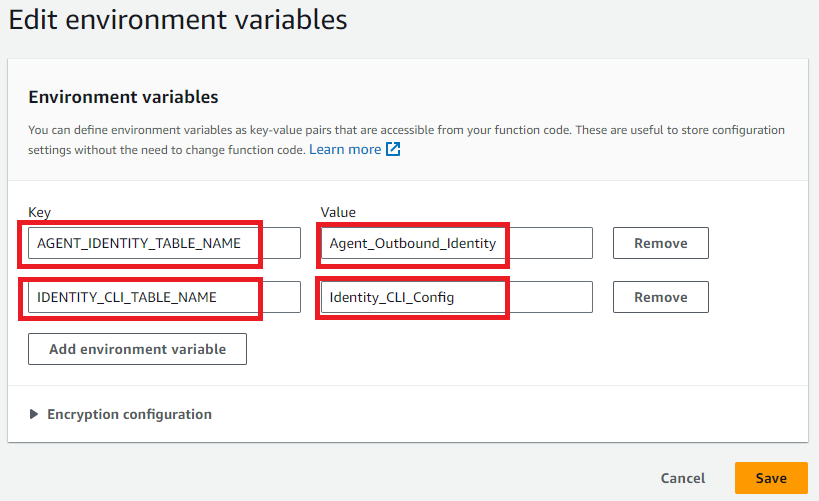
Similar to before, we need to add in our table names as environment variables. We need to reference both tables this time:
Create API Gateway to invoke Lambda from Salesforce
Next step is to set up an API Gateway which can be invoked from a CTI Action in Salesforce, which then triggers our ‘Update_Identity’ Lambda function.
Navigate to the API Gateway console, and click ‘CreateAPI’. In the ‘REST API’ section, click ‘Build’. Add a name for the API and a description, if desired.
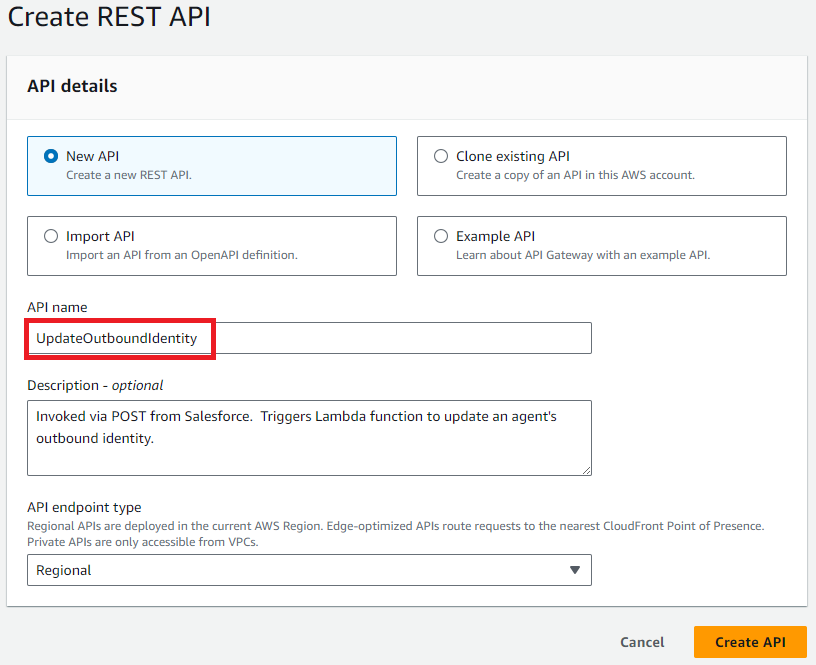
Click ‘Create API.’
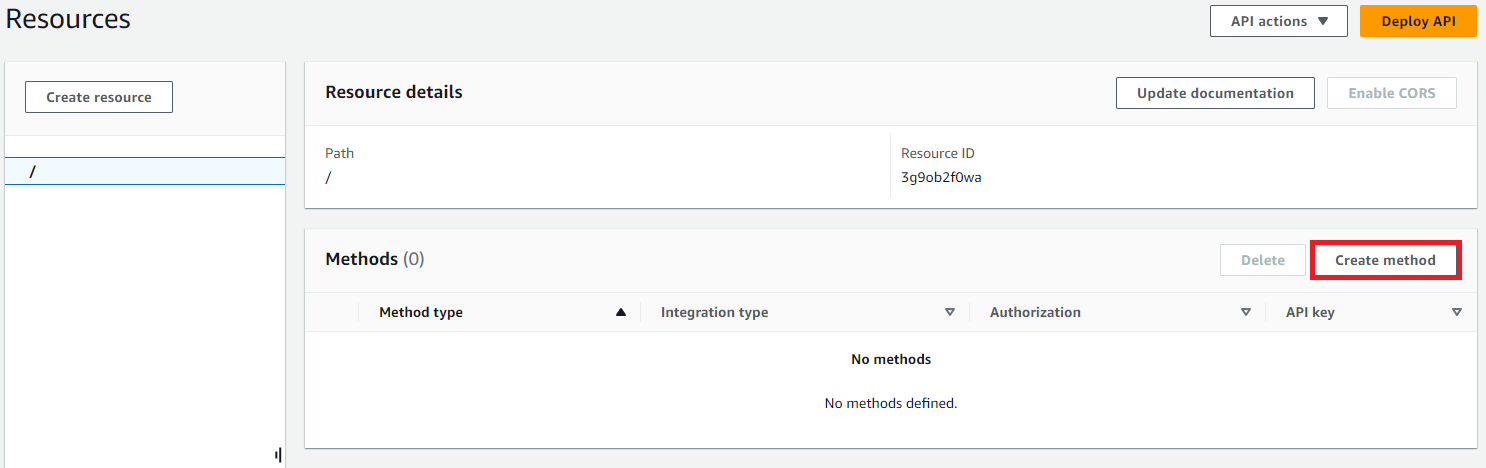
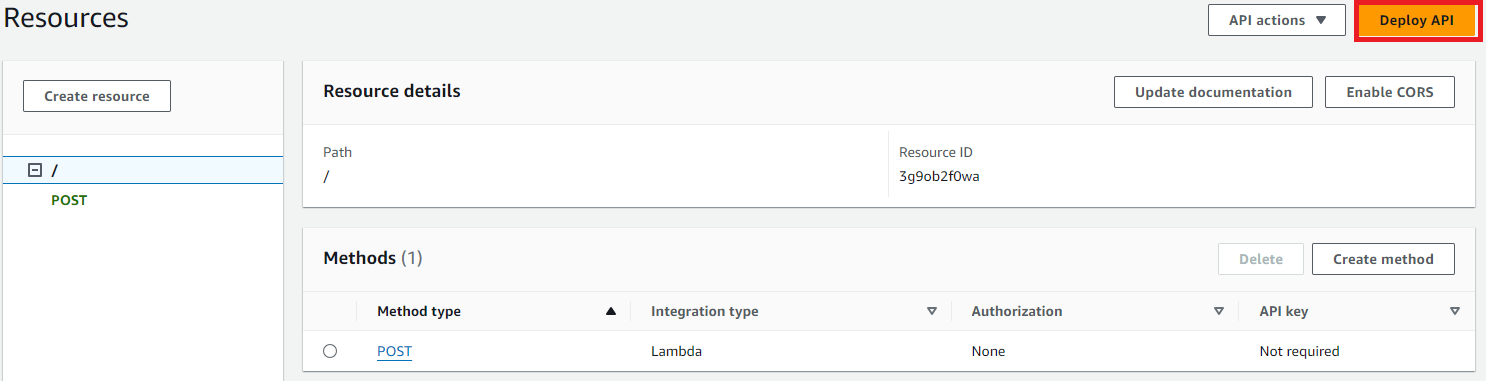
When the API is created, click ‘Create method.’
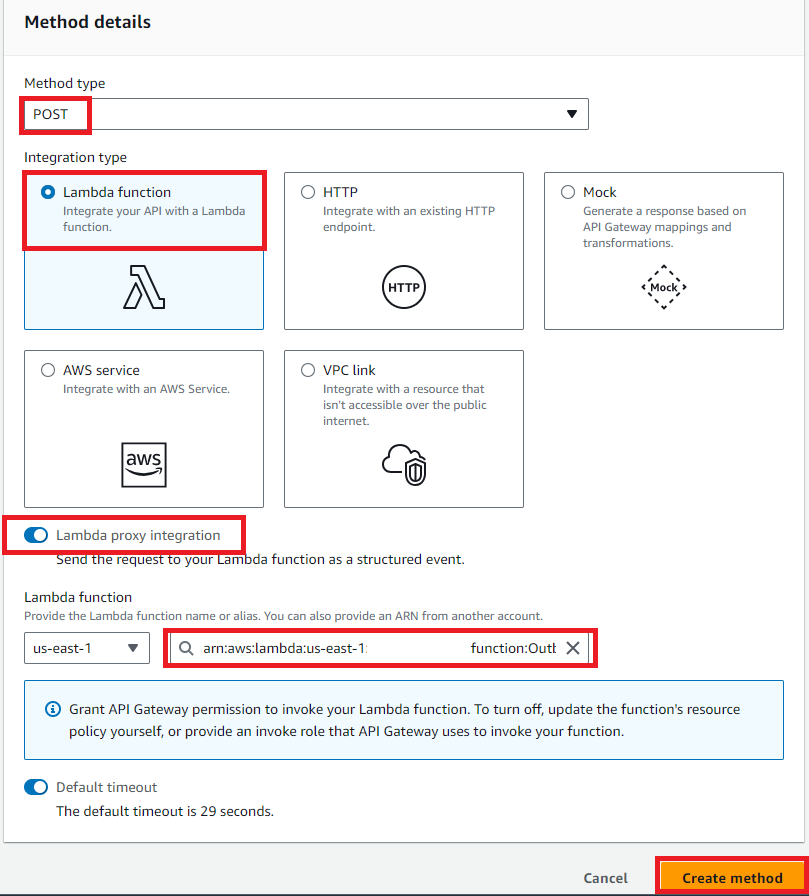
Select ‘POST’ as the Method type, and ‘Lambda function’ as the Integration type. Check the radio button to enable ‘Lambda proxy integration.’ Choose the ‘Update_Identity’ Lambda function from the list of functions. Then click ‘Create method.’
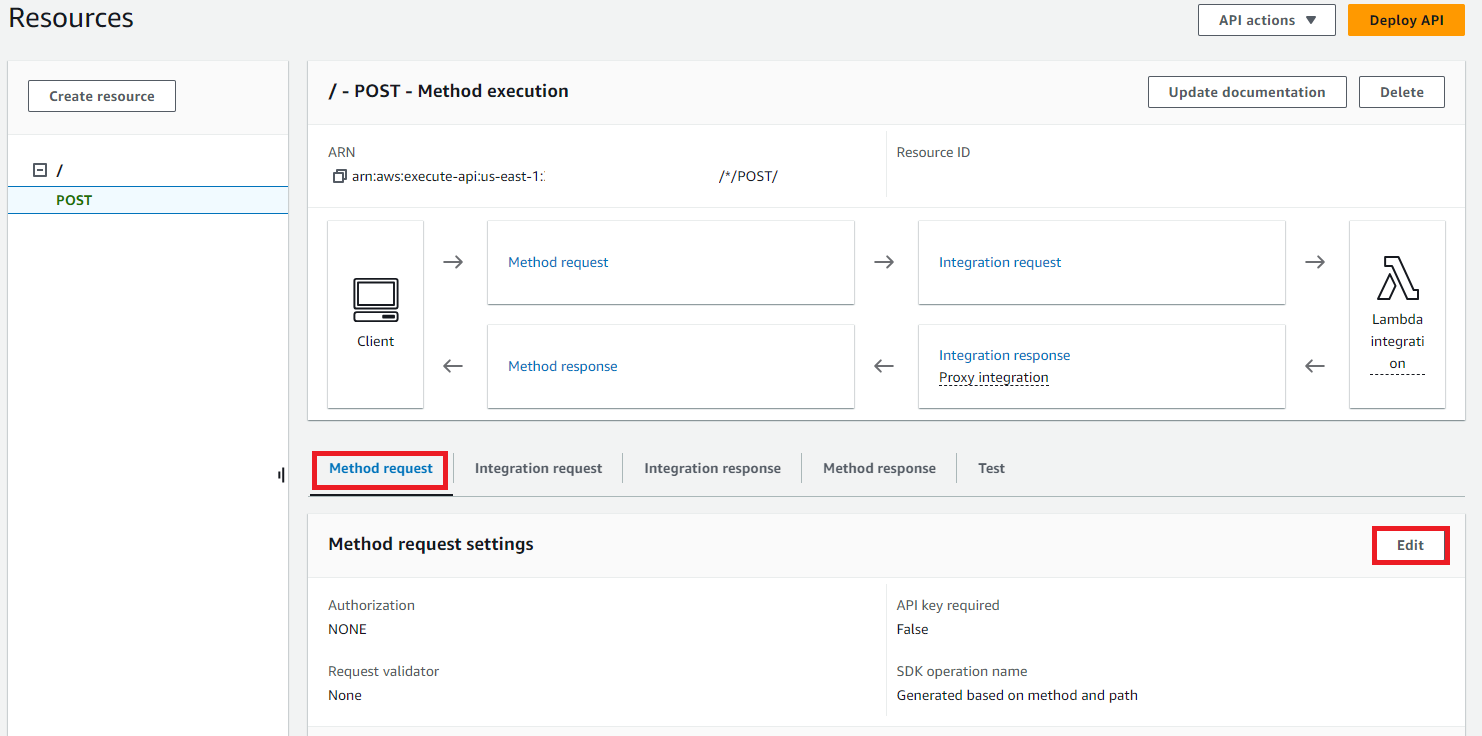
In our new ‘POST’ resource, with ‘Method request’ selected, click ‘Edit.’
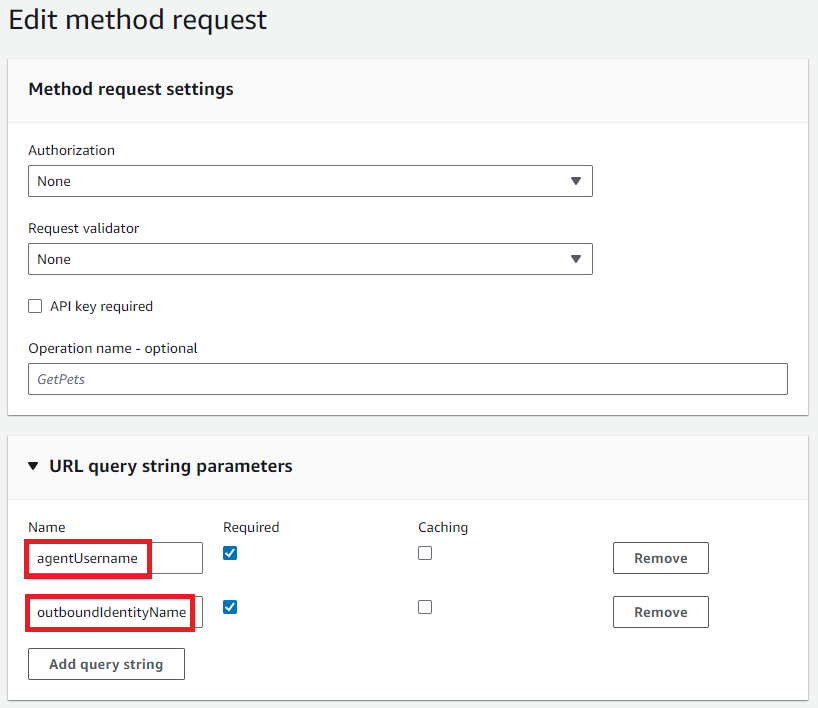
In the ‘URL query string parameters’ section, add in two entries as follows, for ‘agentUsername’ and ‘outboundIdentityName’. Tick the box for ‘Required’ next to each value. These will pass the agent and identity information from Salesforce to our Lambda function. Click ‘Save.’
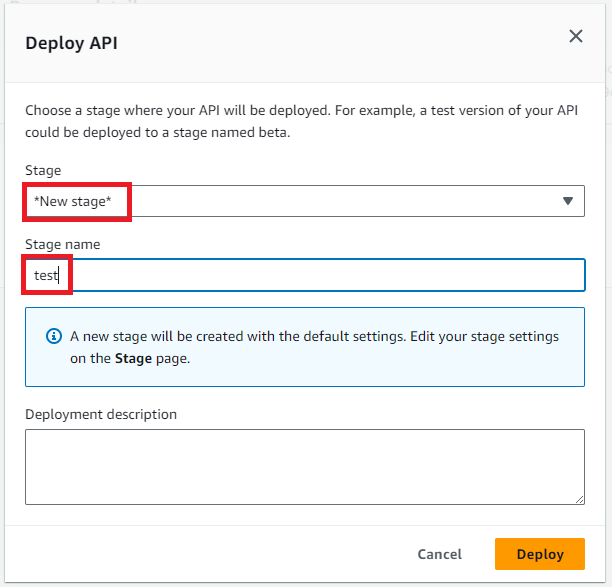
Next, click ‘Deploy API.’
Select ‘New stage’, and give the stage a name, I’ve used ‘test’. Then click ‘Deploy.’
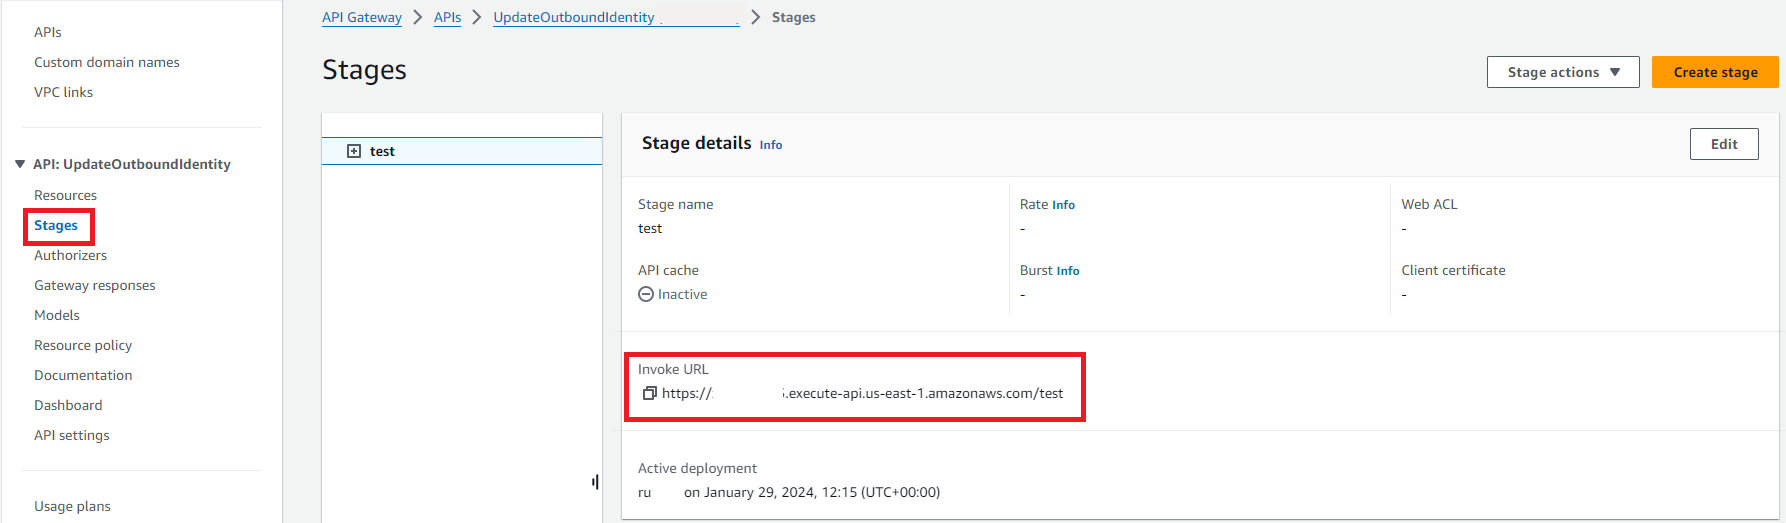
Make a note of the Invoke URL of your API, you can see this by clicking ‘Stages’ in the left-hand pane.
Create CTI Flow in Salesforce
The next step is to set a couple of things up in Salesforce, which enable an agent to use a dropdown to select their desired outbound CLI to use.
First, we’ll add a CTI Flow.
I haven’t found much detailed documentation around CTI Flow creation; there was a bit of trial and error involved in getting this to work. What we are doing here is getting a couple of values within the CTI Flow (the desired outbound identity, the agent’s username) and combining them with our API Gateway Invoke URL, to provide a string which passes the details over to our Lambda function in the API call.
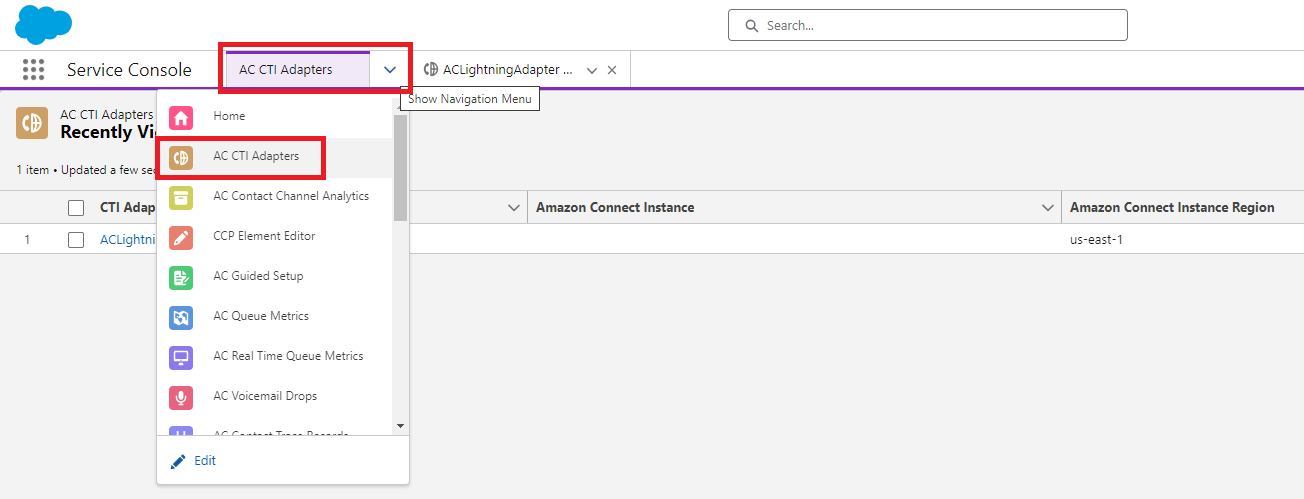
We need to be in Salesforce, in the ‘AC CTI Adapters’ navigation item. (The prerequisite here is to have already set up your CTI Adapter integration.)
Select the CTI Adapter you want to edit and scroll towards the bottom of the config page. Select the ‘CTI Flows’ tab, and click ‘New.’
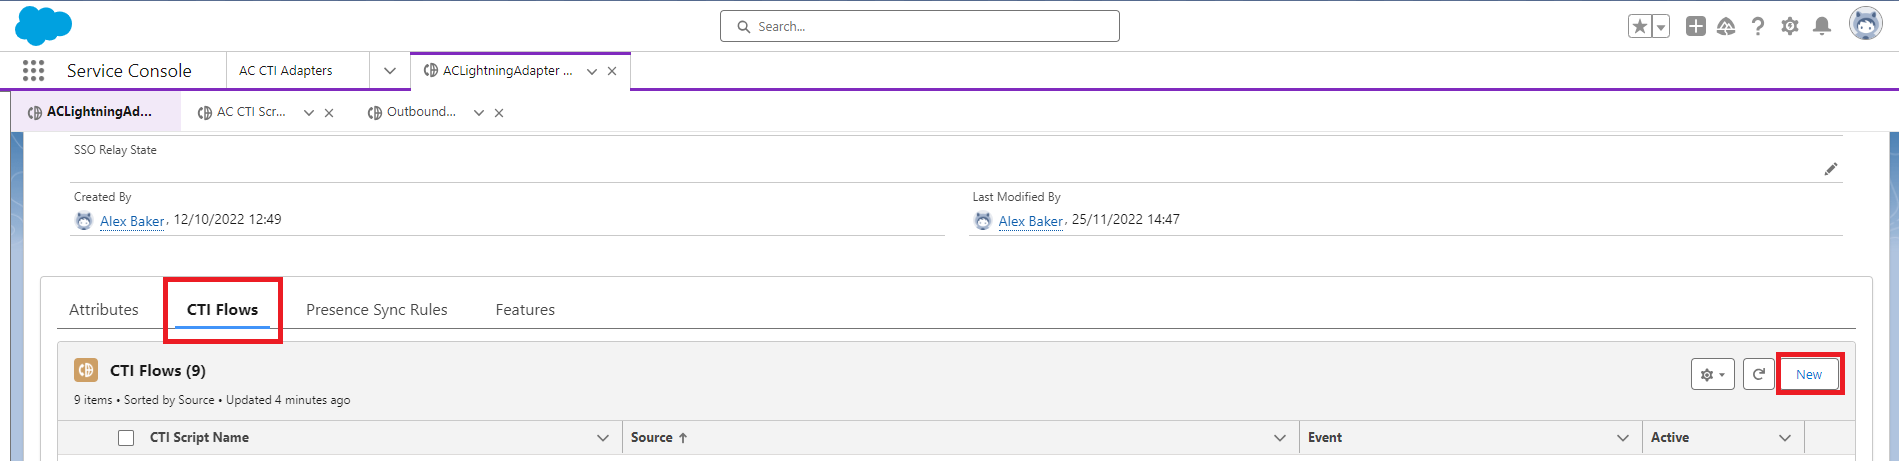
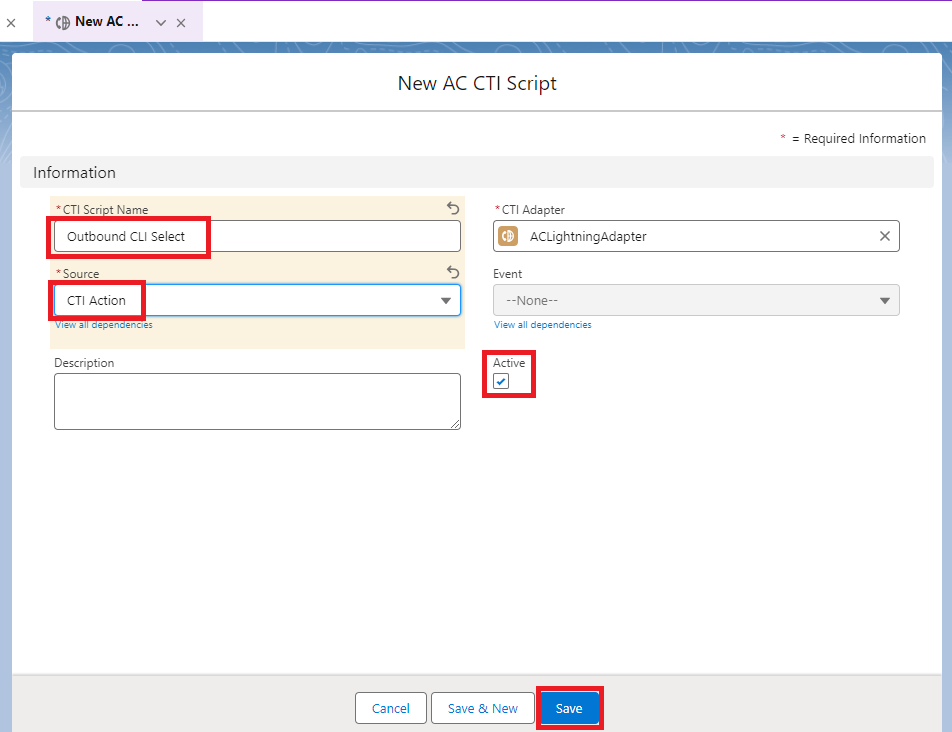
Give the CTI Flow a name, I’ve used ‘Outbound CLI Select’. Select the Source from the drop down as ‘CTI Action’. Ensure the ‘Active’ box is ticked, then click ‘Save.’
In the CTI Flow editor section, use the ‘Upload’ button to upload this flow template:
Download the file.
You’ll need to make one change to the template, all the other provided values should work fine. Click into the second ‘Set Property’ block from the start.
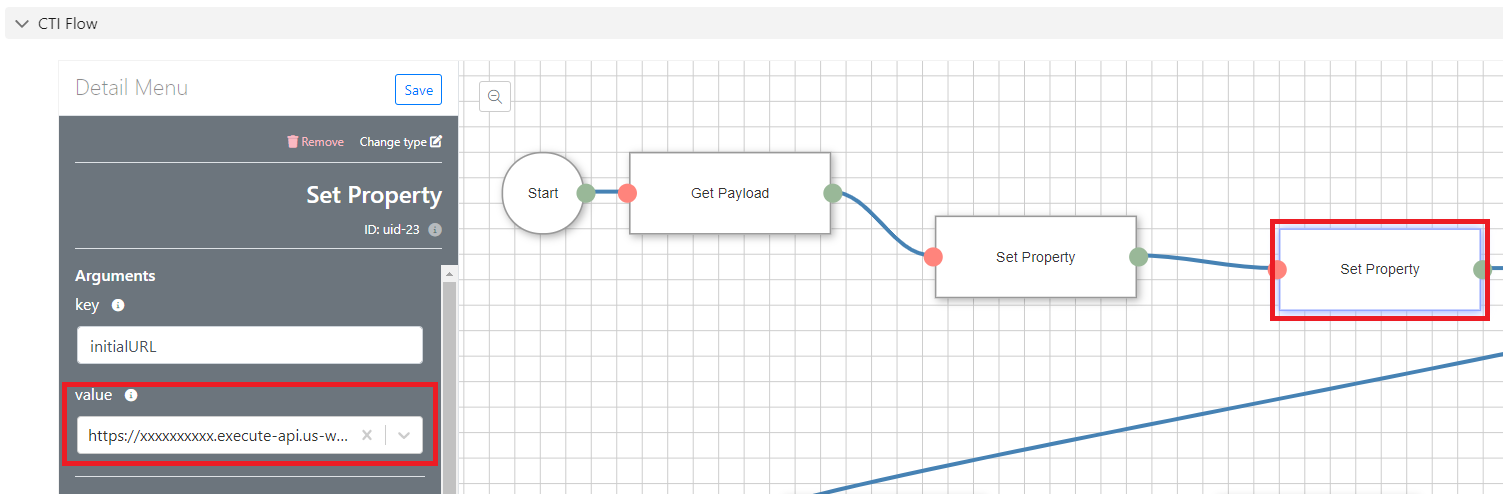
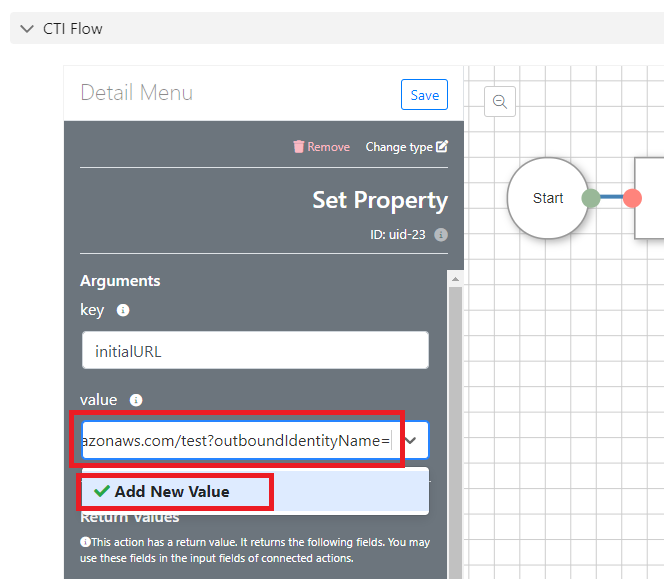
You’ll need to add the Invoke URL of your API, that we made a note of earlier, with a suffix of your API stage name, and then a question mark, followed by our ‘outboundIdentityName’ value, and finally an equals sign. You may want to pull this together in a text editor, before pasting it into the CTI Flow. It should look something like this:

Paste in the new value, click ‘Add New Value’, then save the CTI Flow:
Create CTI Action in Salesforce
Now we need to create a CTI Action which will be visible to an agent in their embedded CCP, and allow them to choose their outbound Identity.
In the Navigation Items dropdown, select ‘CCP ElementEditor.’
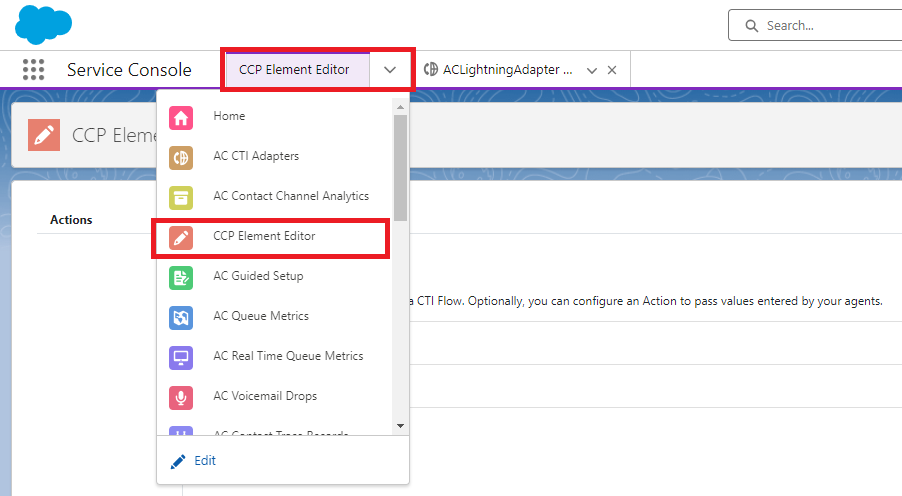
Click ‘New Action’:

Give the Action a name. This is the name the agents will see. I’ve used ‘Select Outbound Identity’. Then select the CTI Flow we just configured, from the dropdown.
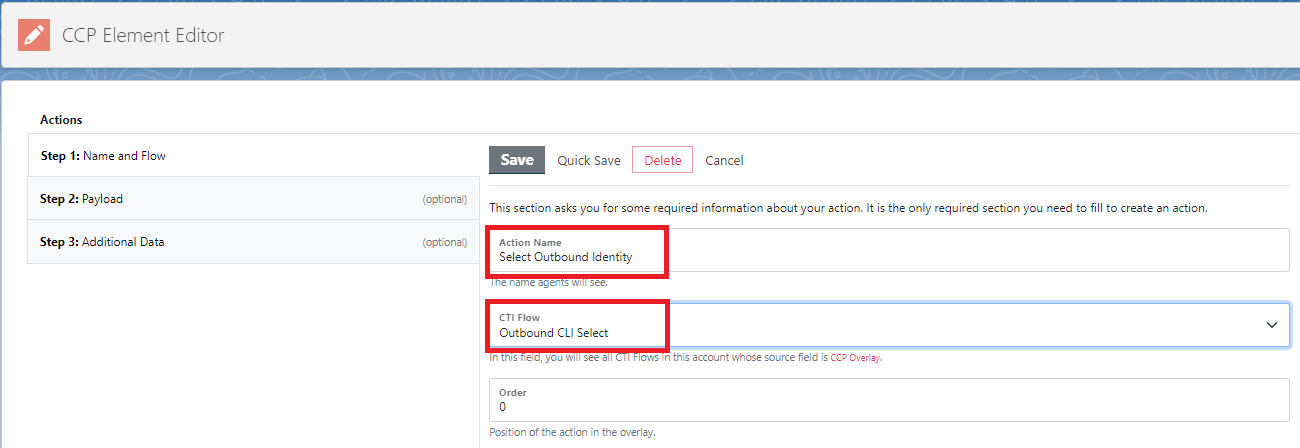
Go to section ‘Step 3: Additional Data’. Give the form a title, I’ve used ‘Select Outbound Identity’ again. Add instructions if you wish.

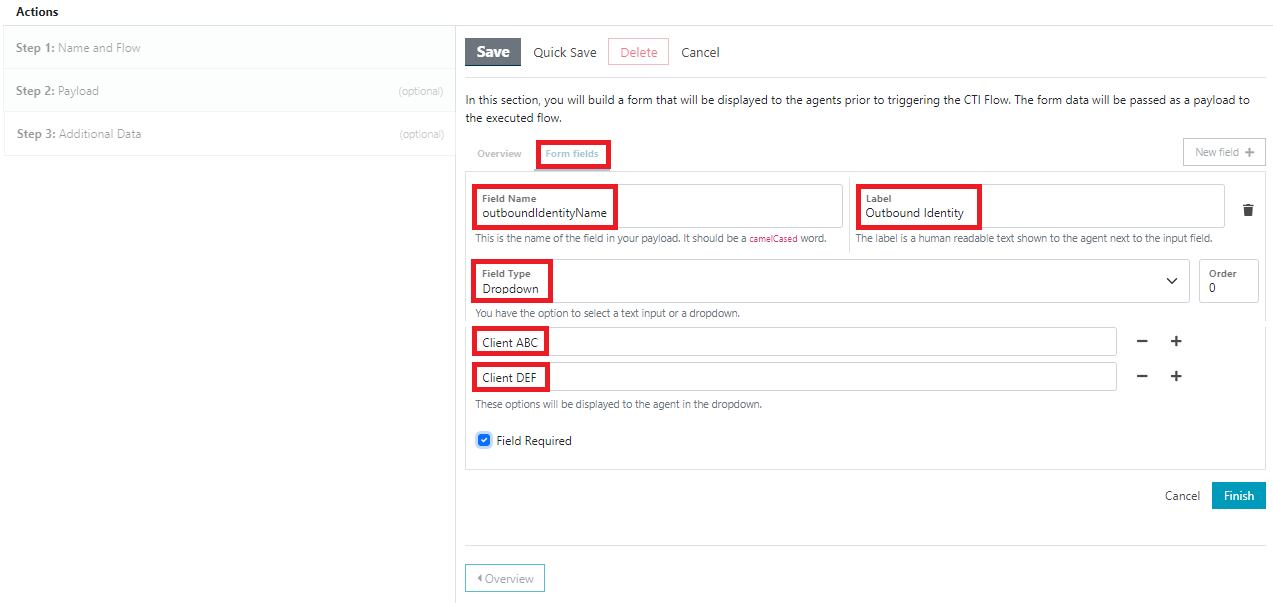
Move from the ‘Overview’ tab to the ‘Form fields’ tab. Add a ‘Field Name’ of ‘outboundIdentityName’. (Note that this should be exactly the same as the value referenced in the CTI Flow.)
Add a ‘Label’ of ‘Outbound Identity’, or whatever you want the agent to see as the label.
Select a ‘Field Type’ of ‘Dropdown’. Then add the identity names, as specified in our Identity_CLI_Config DynamoDB table earlier. Tick the ‘Field Required’ box. Then click ‘Finish’, and finally, click ‘Save.’
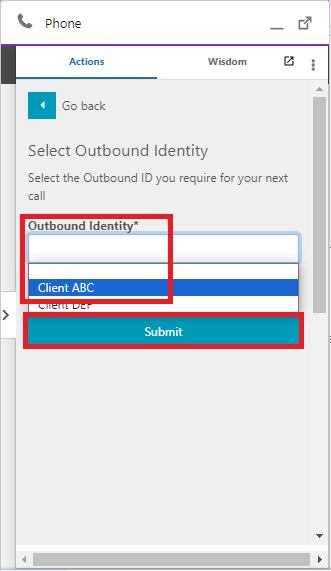
If we refresh our Salesforce page now, and then log in to the embedded CCP as an agent, we should be able to see our new CTI Action. Bring up the CCP, and click the small arrow on the right-hand side.
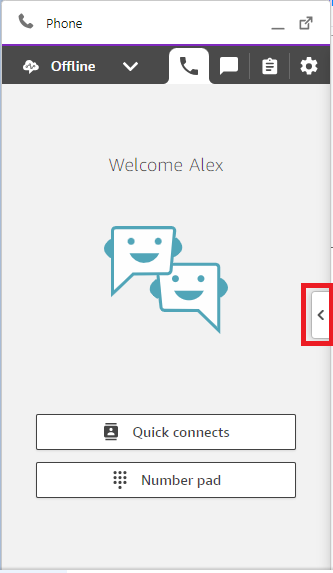
In the ‘Actions’ tab, you should see the new CTI Action.

And then you should be able to select the desired Outbound Identity from the dropdown, and click ‘Submit.’
If everything is set up correctly, if we go back to our Agent_Outbound_Identity DynamoDB table, we should be able to see that an entry has been created, mapping our agent username to the Outbound Identity name that we selected from Salesforce.

Add customised Outbound contact flow in Connect
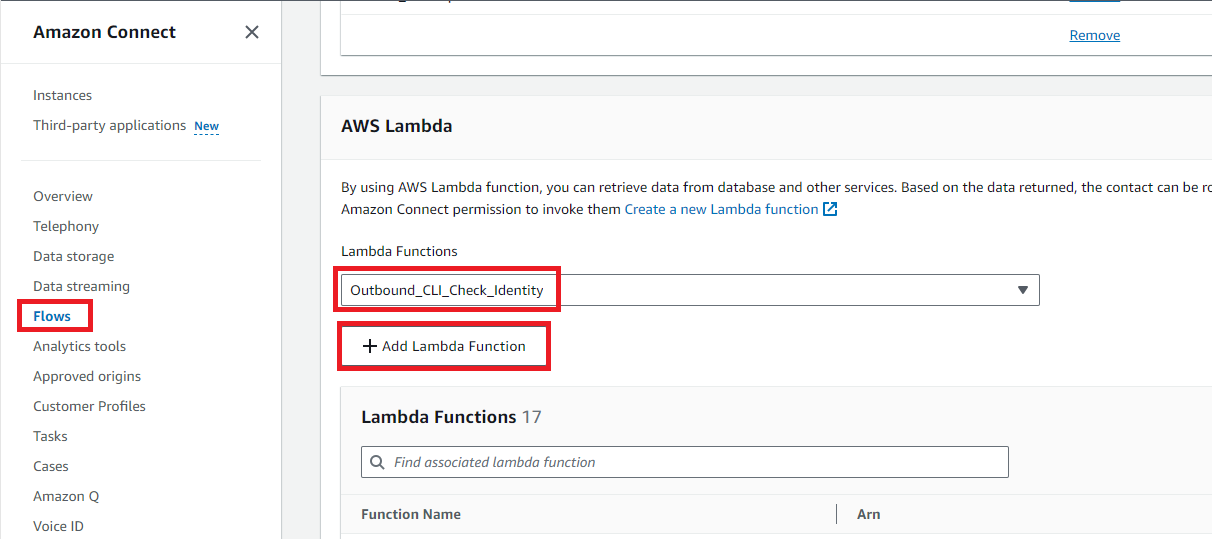
The final few pieces of configuration we need are in Amazon Connect. We need to add an Outbound contact flow which will dynamically use the agent’s chosen Outbound Identity when making a call. We’ll also need to make one of our Lambda functions available to Amazon Connect, so we can use it in the contact flow.
In the instance settings for your Connect instance, click on ‘Flows’, and scroll down to the ‘AWS Lambda’ section. Select our ‘Outbound_CLI_Check_Identity’ function from the dropdown, and click ‘Add Lambda function’:
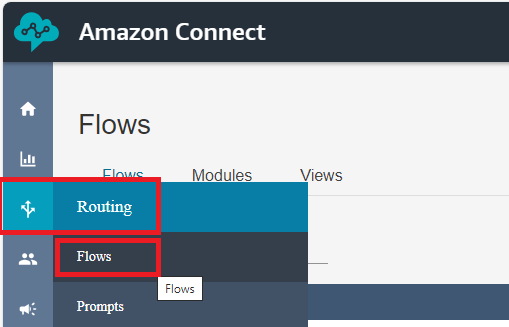
Next, in the Amazon Connect portal, navigate to ‘Flows.’
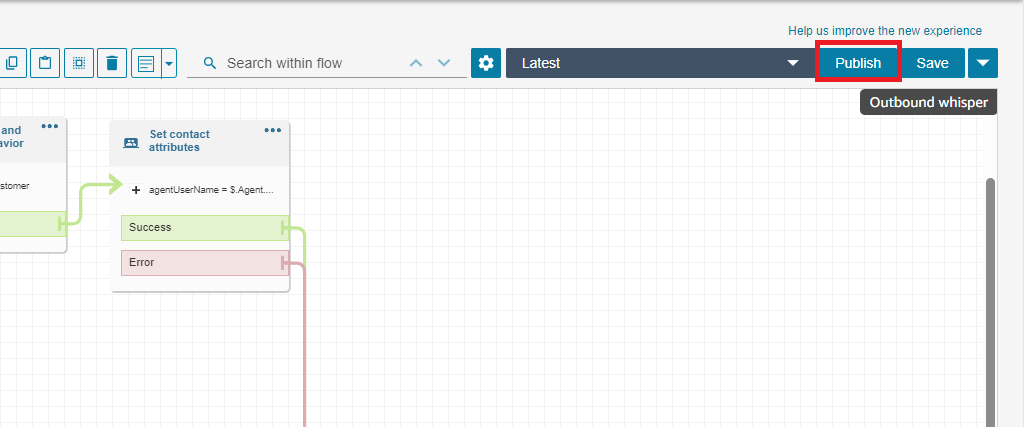
On the right-hand side, click the dropdown arrow next to ‘Create flow’, and select ‘Create outbound whisper flow.’

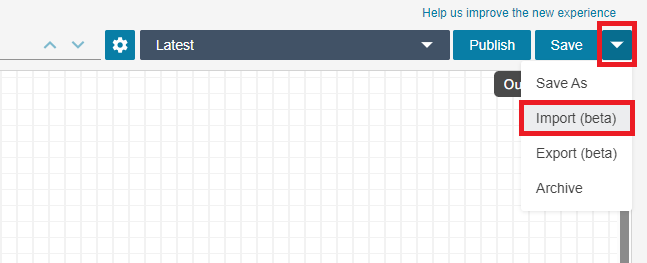
Click the dropdown arrow next to ‘Save’, and select ‘Import(beta)’. Import the template contact flow.
Download the file.
Click into the ‘Invoke AWS Lambda function’ block, and select your version of the ‘Outbound_CLI_Check_Identity’ function. Click ‘Save.’

Make sure to publish the contact flow.
Add Outbound queue, and add it to Routing Profile
The Outbound whisper flow is determined within the configuration for a particular queue. I’ve set up a specific queue for outbound calls, which invokes our new Outbound whisper flow. (There are a couple of limitations to this approach, which we’ll mention in the conclusion.)
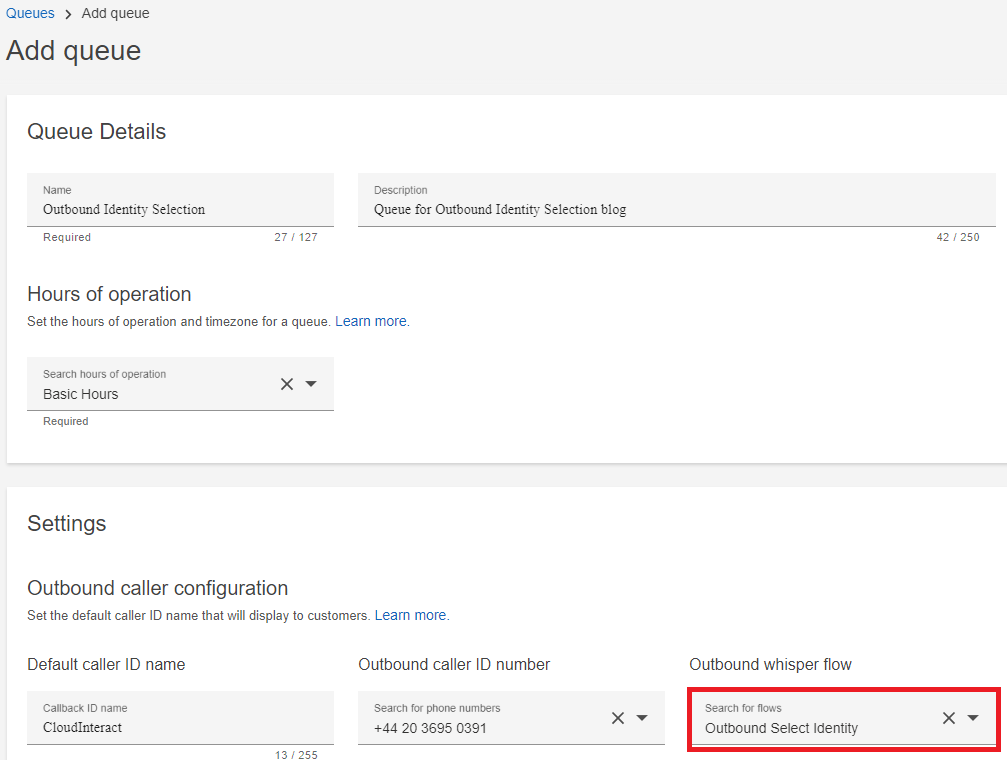
The last step is to configure the Default outbound queue within the Routing profile for agents using this solution. I’ve selected the ‘Outbound Identity Selection’ queue from the previous step, as the outbound queue in my Routing profile:

Test…
As an agent in Salesforce, you should now be able to toggle between Outbound Identities. Try switching between them, and make a call to your mobile, using each identity. Confirm that the presented CLIi is correct in each case.
Conclusion
We’ve used the Salesforce CTI Adaptor, plus a couple of AWS services, to enable manual selection of outbound caller identity. We’ve provided this in a user-friendly way, within the agent’s existing embedded CCP workspace in Salesforce.
As mentioned earlier, there are a few potential limitations to this implementation. Reporting, for example; in the blog post we assume it’s OK for outbound calls to be attributed to a single outbound queue, whereas in practice if you’re making calls on behalf of multiple clients, you may wish to break down the reporting accordingly.
Also, there is no notification to the agent to tell them which identity they currently have set. So they’d probably need to set the desired identity before each call to be certain of using the correct one.
Finally, for production use you may wish to add additional security to the API Gateway.
Feel free to contact the team at CloudInteract to discuss some of the ways you could work around the limitations above, and expand on this PoC.
Alex Baker
Contact Centre Consultant and AWS Solution Architect at CloudInteract
.svg)
.svg)

Want to know more?
See our other articles
Mastering Amazon Connect Billing: Subscription vs. Consumption-Based Models
When navigating Amazon Connect’s billing models, it’s crucial to understand the difference between subscription and consumption-based pricing.
Streamlining Operations during a Complex Divestiture with Advanced Contact Centre and Workplace Solutions
Our customer, a global leader in clinical research, was faced with an immense challenge following its recent divestiture from its parent company.
Reimagine the Future of your Contact Centre – Webinar Recap
Unlock the potential of modern contact centres with Amazon Connect and Cloudnteract. Learn best practices, AI strategies, and actionable steps from industry experts in our webinar recap.

SIGN UP FOR OUR EMAILS
Website Design by Global Exposure
