


.svg)
Amazon Connect Communications Widget: Enhancing Customer and Agent Experience with Context and Custom Views.
In this blog post, our focus is on optimising interactions between customers and agents through the strategic use of context in the AmazonConnect Communications Widget. We'll explore how to pass contextual information effectively and employ Step-by-step Guides to streamline processes and enrich experiences for both parties. If you're new to the Amazon Connect Communications Widget, you can start by exploring its features and customisations in my previous blog post here.
Below is an example of how these features can be leveraged, and this blog will provide you with all that you need to achieve this.
Customer View
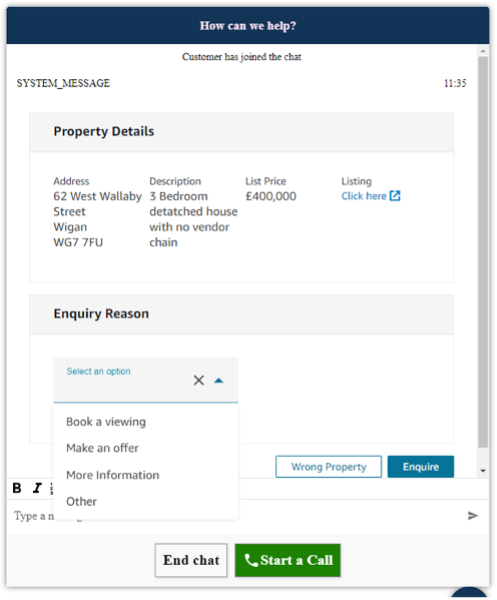
By passing contextual information, we're able to surface details and collect input from customers using Step-by-step guides. In this blog, we'll use the example of an Estate Agents. In the customer view showcased here, context has been passed to the Communications Widget regarding the property they're contacting about. This information is presented to the customer, allowing them to review the details and provide a reason for their enquiry.
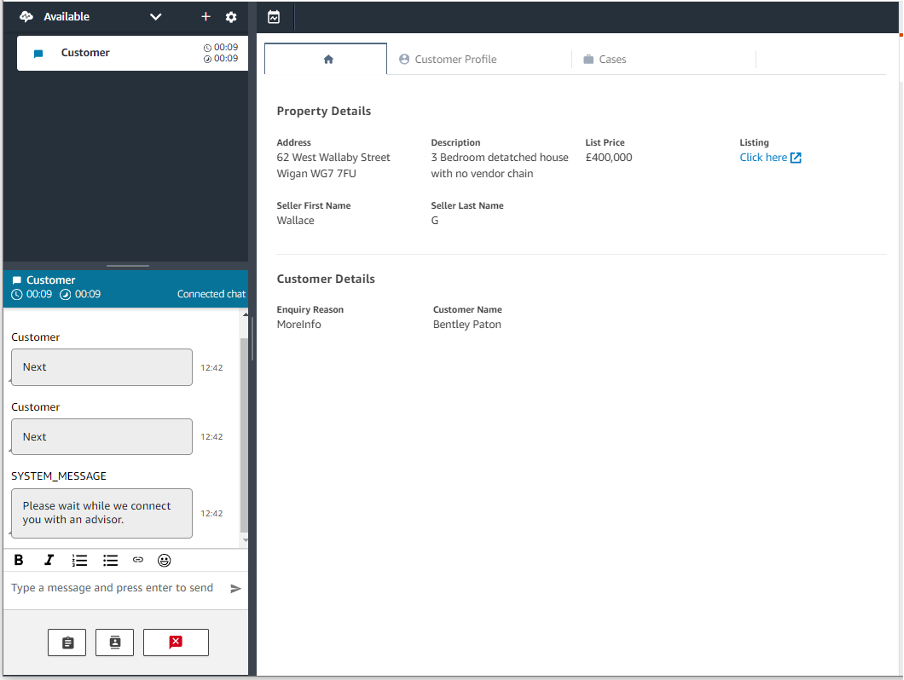
Agent View

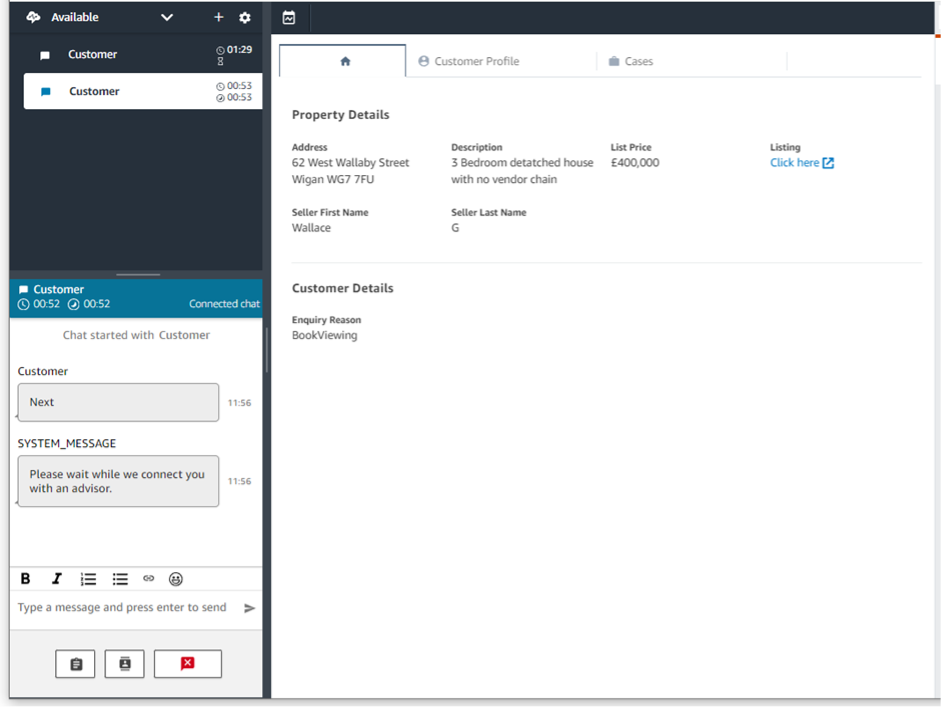
The same information is surfaced to the Agent along with additional details about the seller of the property and the customer’s chosen Enquiry Reason. The customer's name is also captured, which will be later in this blog.
Passing Context with Amazon Connect:
Context is key to fostering meaningful interactions between customers and agents. By passing context parameters through the Amazon Connect Communications Widget, you can enrich interactions with relevant information before the customer has exchanged words with an agent.
Examples of contextual data could include the type of device, reason for contact, customer details, preferences, etc.
This approach empowers agents to address customer queries promptly, eliminates the need for redundant inquiries, and tailors responses to provide personalised assistance, enhancing the overall customer experience. Ultimately, context leads to more efficient and satisfying interactions for both parties.
Recently, AWS introduced support for Step-by-step Guides for customers in live chat, enabling the presentation of rich, interactive pages or workflows within the chat interface. This addition enhances self-service capabilities, thereby boosting efficiency and improving the experience for both customers and agents. I'll demonstrate how this feature can leverage context provided to the Communications Widget to surface relevant information to both customers and agents. The context shared and gathered during interactions can be utilised to set contact attributes and tag the contact with valuable insights, enabling a deeper understanding of customer behaviour, preferences, and more. Leveraging these insights enables informed decision-making, process optimization, and enhanced customer experience.
Hands-on:
For this demonstration, let's consider a fictional Estate Agents scenario to illustrate how to implement these features. If you haven't set up the Amazon Connect Communications Widget yet, you can follow the setup instructions provided in my previous blog post to get started in less than 10 minutes.
When contacting an estate agent, customers often need to provide their identity, specify the property of interest, and state the reason for reaching out. Let's streamline this process by leveraging a simple QR Code as the initiation method. Estate agents often provide print outs, leaflets or brochures, where a ‘Contact Us’ QR Code could be very easily included.
I’ve started with a simple DynamoDB table to mock the estate agent’s backend to store property details.
Example:
{
  "property_id": "150804093",
  "address": "62 West Wallaby Street\nWigan\nWG7 7FU",
  "description": "3 Bedroom detatched house with no vendor chain",
  "listing_url": "https://cloudinteract-estates.io/150804093",
  "list_price": "£400,000",
  "seller_first_name": "Wallace",
  "seller_last_name": "G"
 }
Using DynamoDB Streams and a Lambda Function, we'll automatically generate a QR Code for each property and upload it to an S3 bucket. The QR Code will navigate to the widget host URL while appending a query string parameter 'property_id'. Additionally, the Lambda Function will update the record to include the S3 bucket location for the QR Code.
Below is the function code I used to achieve this:
import boto3
import qrcode
from qrcode.image.pure import PyPNGImage
from typing import Mapping, Any
import os
import functools

# ENVIRON
BASE_URL = os.environ.get('BASE_URL', 'http://localhost:3000')
S3_BUCKET_NAME = os.environ["S3_BUCKET_NAME"]
TABLE_NAME = os.environ["TABLE_NAME"]

@functools.lru_cache(1)
def get_s3_client():
    return boto3.client('s3')

@functools.lru_cache(1)
def get_dynamodb_client():
    return boto3.client('dynamodb')

def put_item_into_s3(filename: str, content: bytes) -> Mapping[str, int]:
    s3 = get_s3_client()
    s3.upload_file(content, S3_BUCKET_NAME, filename)

def generate_qr_code(property_id: str) -> bytes:
    return qrcode.make(f"{BASE_URL}/?serial={property_id}")

def update_db_item_with_s3_location(property_id: str):
    ddb = get_dynamodb_client()
    ddb.update_item(
    TableName=TABLE_NAME,
    Key={
        'property_id': {
            'S': property_id,
        }
    },
    AttributeUpdates={
        'qrcode_s3_bucket_location': {
            'Value': {
                'S': f"https://eu-west-2.console.aws.amazon.com/s3/object/{S3_BUCKET_NAME}?region=eu-west-2&bucketType=general&prefix={property_id}.png",
            },
            'Action': 'PUT'
        }
    }
)

def handler(event: Mapping[str, Any], context):
    for record in event['Records']:
        if record['eventName'] == 'INSERT':
            property_id = record['dynamodb']['Keys']['property_id']['S']
            qr_code = generate_qr_code(property_id)
            with open(f"/tmp/{property_id}.png", 'wb') as f:
                qr_code.save(f)
            put_item_into_s3(f'{property_id}.png', f'/tmp/{property_id}.png')
            update_db_item_with_s3_location(property_id)
The resulting QR Code will facilitate seamless initiation of communication with the estate agent via the Amazon Connect Communications Widget.
An example generated QR Code is below, using localhost as the base URL.

Amazon Connect Integration:
To pass contact attributes to the chat, we have two methods as outlined in the AWS documentation (https://docs.aws.amazon.com/connect/latest/adminguide/pass-contact-attributes-chat.html).
Method 1:
Simply add the attributes as a key value pair to your JavaScript snippet:
amazon_connect('contactAttributes', {
  foo: 'bar'
 })
Method 2:
Send the contact attributes to the widget using a JavaScript Web Token. In this blog, we'll use Method 2 and utilize URL Query String parameters to pass the 'property_id' corresponding to a house listing stored in our database. Below is an example implementation of this method into the widget script:
amazon_connect('authenticate', function(callback) {
  const urlParams = new URLSearchParams(window.location.search);
  const propertyId = urlParams.get(property_id);
      window.fetch('API_GATEWAY_URL, {
          method: 'POST',
          headers: {
              'Content-Type': 'application/json',
          },
          body: JSON.stringify({ property_id: propertyId }),
      })
      .then(res => res.json())
      .then(data => {
          const responseBody = JSON.parse(data.body);
          callback(responseBody);
      })
      .catch(error => {
          console.error('Error:', error);
      });
  }
);
This method ensures data integrity but requires additional setup steps compared to Method 1.
Extra Steps for Method 2:
1. In Amazon Connect, navigate to 'Communications Widgets' and select your widget.
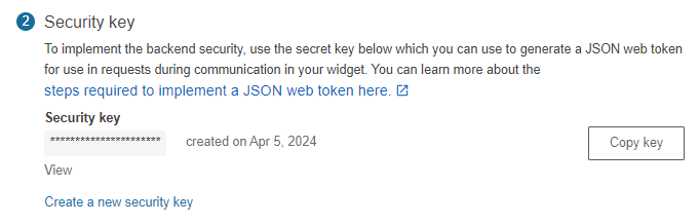
2. Scroll to the bottom of the page, click 'Create a new security key', and copy the key. Follow appropriate security practices to secure the chat widget.
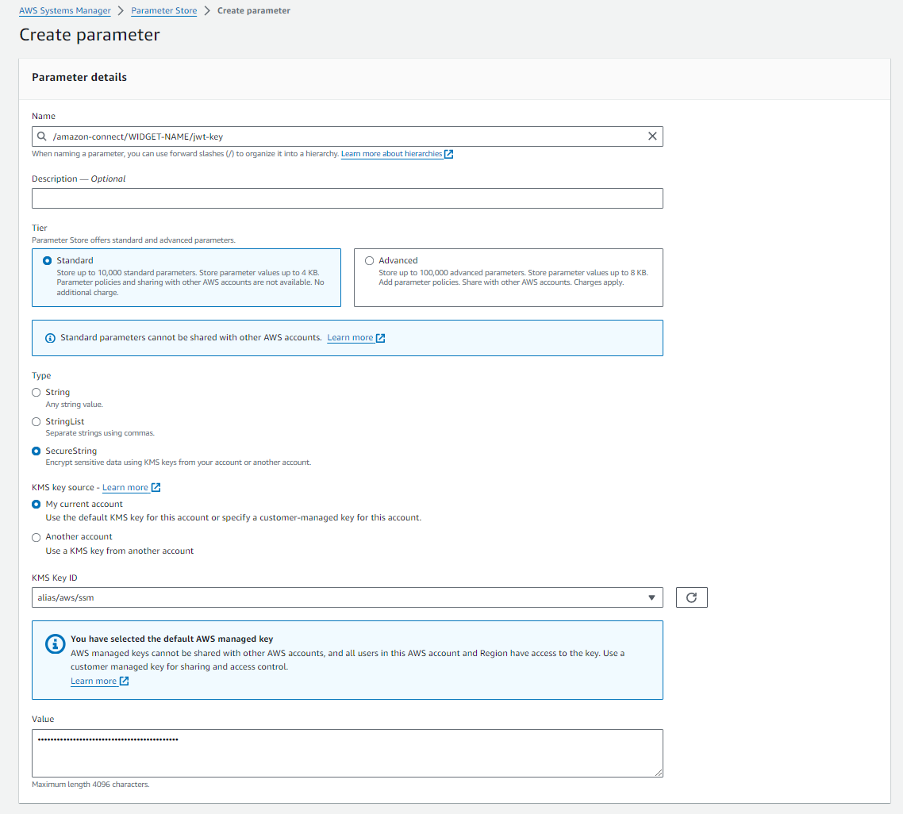
3. Navigate to AWS Console > Systems Manager > Parameter Store and create a new parameter with an appropriate name and type 'SecureString' to encrypt the key.
4. Set up an API Gateway and a Lambda Function to serve requests. Create a Lambda Function using Python 3.11 or higher. Below is an example Lambda function that takes the 'property_id' from a POST request and retrieves information from a DynamoDB table to be passed as contact attributes to the chat widget.
Lambda Function:
import json
import boto3
import os
import datetime
import jwt
from typing import Mapping

PARAMETER_PATH = os.environ["PARAMETER_PATH"]
TABLE_NAME = os.environ["TABLE_NAME"]
def get_ssm_client():
    return boto3.client("ssm")

def get_dynamodb_client():
    return boto3.client("dynamodb")
def get_item_from_dynamodb(property_id: str):
db = get_dynamodb_client()
response = db.get_item(TableName=TABLE_NAME, Key={"property_id": {"S": property_id}})
return response.get("Item", {}) def get_parameter_from_ssm(parameter_name: str):
ssm = get_ssm_client()
return ssm.get_parameter(Name=parameter_name, WithDecryption=True)["Parameter"]
def get_jwt(attributes: Mapping[str, str]):

    payload = {
        "sub": "a239df7f-e7e4-4efd-aadb-9499b7fb1bf5",
        "iat": datetime.datetime.now(datetime.UTC),
        "exp": datetime.datetime.now(datetime.UTC) + datetime.timedelta(seconds=500),
        "attributes": attributes,
    }

    header = {"typ": "JWT", "alg": "HS256"}

    encoded_token = jwt.encode(
        (payload), get_parameter_from_ssm(PARAMETER_PATH)["Value"], algorithm="HS256", headers=header
    )
    return encoded_token
def lambda_handler(event, context):
try:
property_id = event["property_id"]
item = get_item_from_dynamodb(property_id)
attributes = {key: item[key]["S"] for key in item}
except Exception as e:
attributes = {}
return {
"statusCode": 200,
"body": json.dumps(get_jwt(attributes)),
"headers": {
"Content-Type": "application/json",
"Access-Control-Allow-Headers": "Content-Type,X-Amz-Date,X-Amz-Security-Token,Authorization,X-Api-Key,X-Requested-With,Accept,Access-Control-Allow-Methods,Access-Control-Allow-Origin,Access-Control-Allow-Headers",
"Access-Control-Allow-Origin": "*",
"Access-Control-Allow-Methods": "*",
"X-Requested-With": "*",
},
}
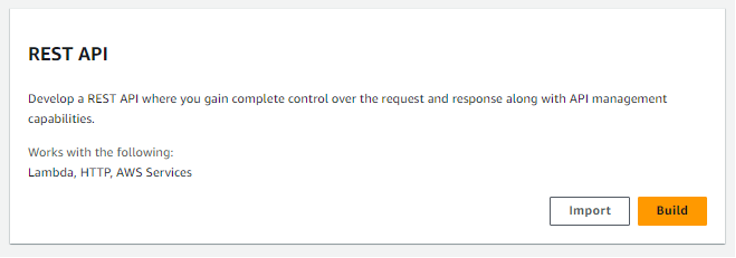
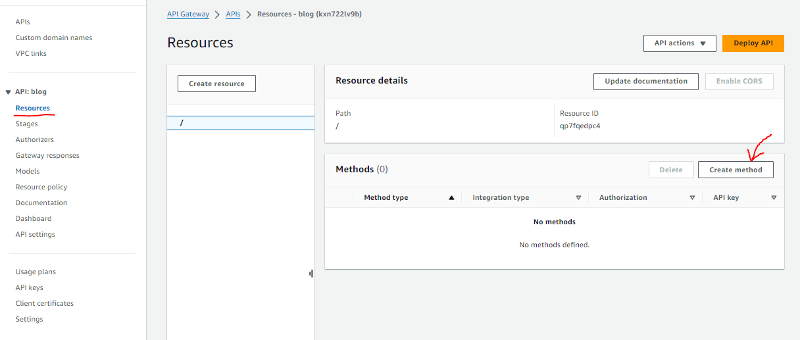
5. Navigate to API Gateway in the AWS Console and create an API. Choose a REST API type and click 'Build'.
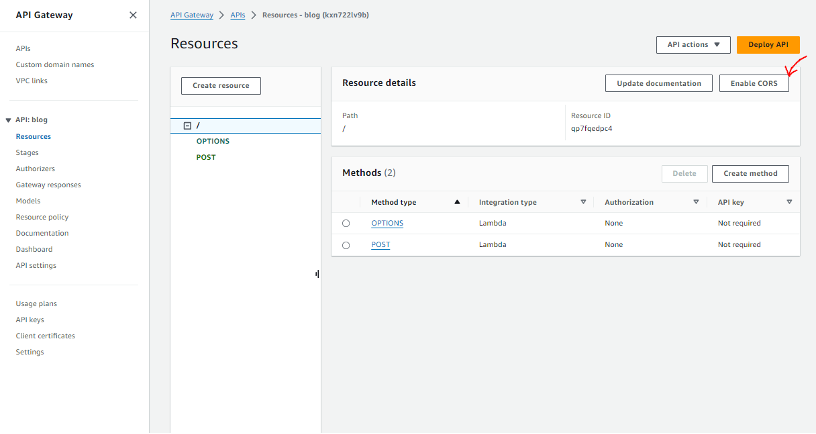
6. After creating the API, navigate to 'Resources' and 'Create method'. Create both 'POST' and 'OPTIONS' methods with Lambda function integration type. Use the ARN of the Lambda function you created earlier and create the method.
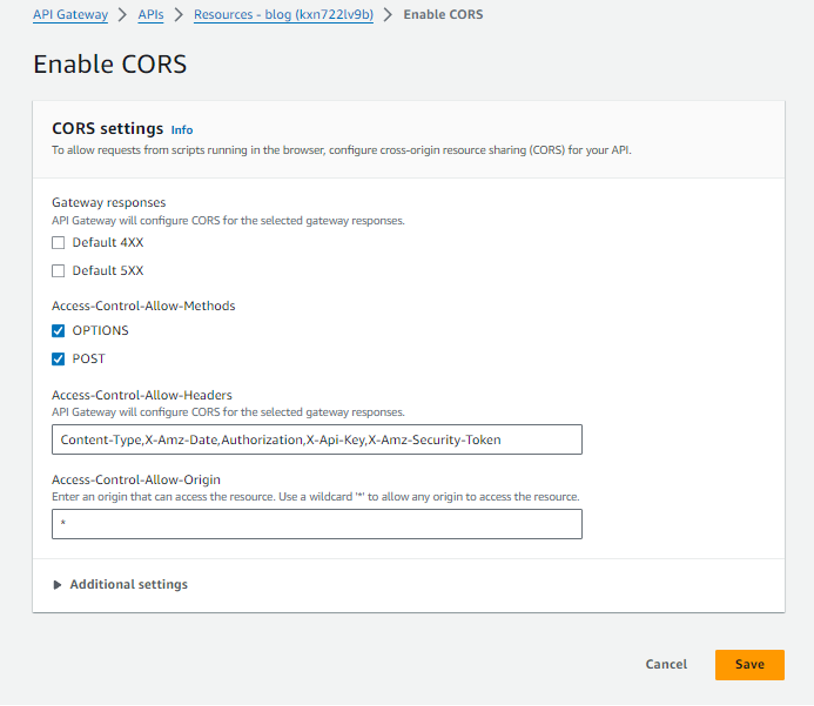
7. Enable CORS by clicking on your resource, then 'Enable CORS'. Allow the OPTIONS and POST methods and specify the origin where your chat widget will be hosted.
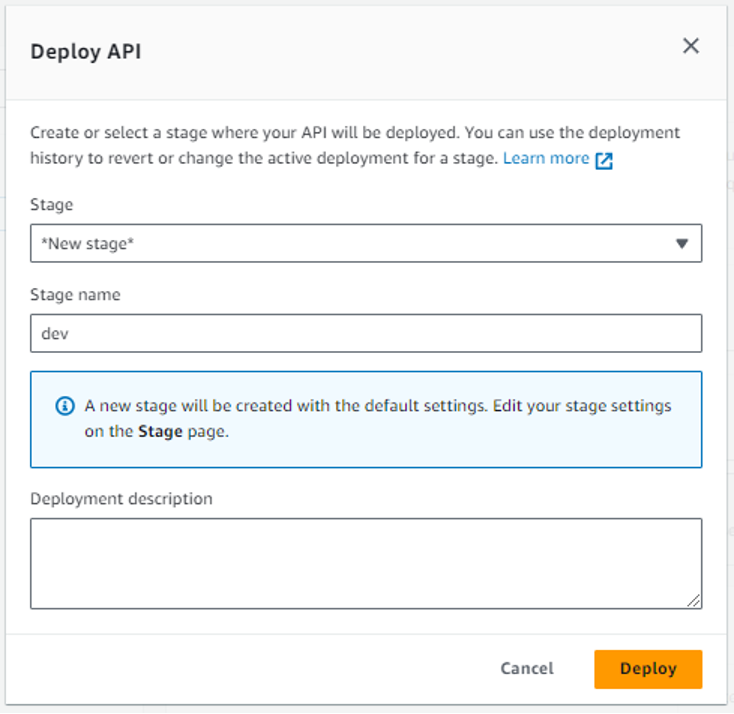
8. Deploy the API, select 'Deploy API - New Stage', and provide a name for the stage (e.g., 'dev'). After deployment, you'll get an Invoke URL, which needs to be added to your JavaScript snippet.
Now, when you open your Amazon Connect Communications Widget, the contact attributes should be associated with the contact, enabling personalized interactions.
Utilising Context in Amazon Connect:
Step-by-step guides or Custom Views in Amazon Connect offer a powerful toolset to enhance both the agent and customer experience. These features enable the presentation of information and collection of inputs without the need for bot configuration.
Let's start by surfacing property details to the customer and allowing them to select a reason for their inquiry.
In your Contact Flow used for Inbound Chat communications, search for the 'Show View' block and add it to your flow. We'll use the 'Form' View type for this demonstration.
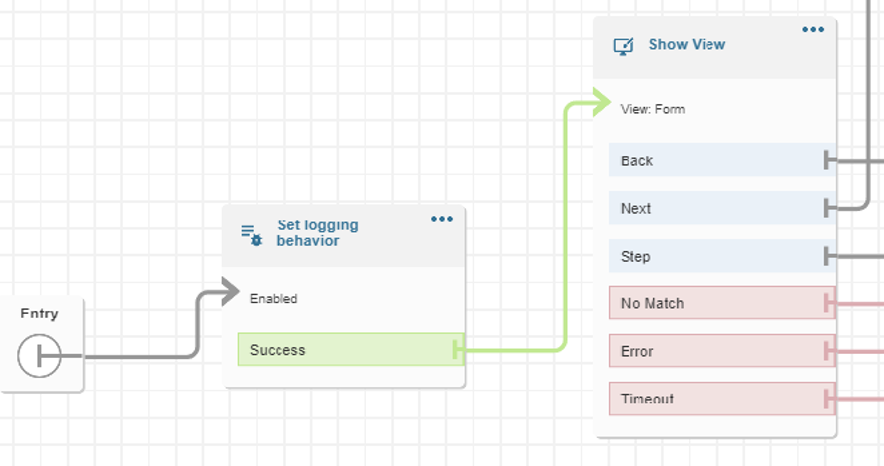
Configure the Sections field to define the UI components, headings, and values for your view using a JSON object.
Below is the configuration I’ve used to surface the Property Address, Description, List Price, and URL in a Data Section. Followed by a separate FormSection with a Dropdown menu with some pre-set Enquiry Reasons.
The notation $.Attributes. tells Amazon Connect to fetch these values from the Contact Attributes – and so as we’ve passed these to the widget when the contact was started, Amazon Connect is already aware of this information.
[
    {
       "Heading":"Property Details",
       "Type":"DataSection",
       "Items":[
          {
             "Label":"Address",
             "Value":"$.Attributes.address"
          },
          {
             "Label":"Description",
             "Value":"$.Attributes.description"
          },
          {
             "Label":"List Price",
             "Value":"$.Attributes.list_price"
          },
          {
             "Label":"Listing",
             "Value":"Click here",
             "LinkType":"external",
             "Url":"$.Attributes.listing_url"
          }
       ]
    },
    {
       "Heading":"Enquiry Reason",
       "Type":"FormSection",
       "Items":[
          {
             "Type":"Dropdown",
             "Label":"Select an option",
             "Name":"EnquiryReason",
             "Options":[
                {
                   "Label":"Book a viewing",
                   "Value":"BookViewing"
                },
                {
                   "Label":"Make an offer",
                   "Value":"MakeOffer"
                },
                {
                   "Label":"More Information",
                   "Value":"MoreInfo"
                },
                {
                   "Label":"Other",
                   "Value":"Other"
                }
             ],
             "DefaultValue":[
                ""
             ],
             "Clearable":true
          }
       ]
    }
 ]
For the 'Cancel' field, set it to 'Set manually' and enter 'Wrong property'. This provides a button for the customer to indicate that the surfaced information is not relevant to their enquiry. Similarly, set the 'Next' field to 'Set manually' and enter 'Enquire', providing a button for customers to continue with their property-related enquiry.
Connect the flow block outputs to the desired behaviour for each outcome.
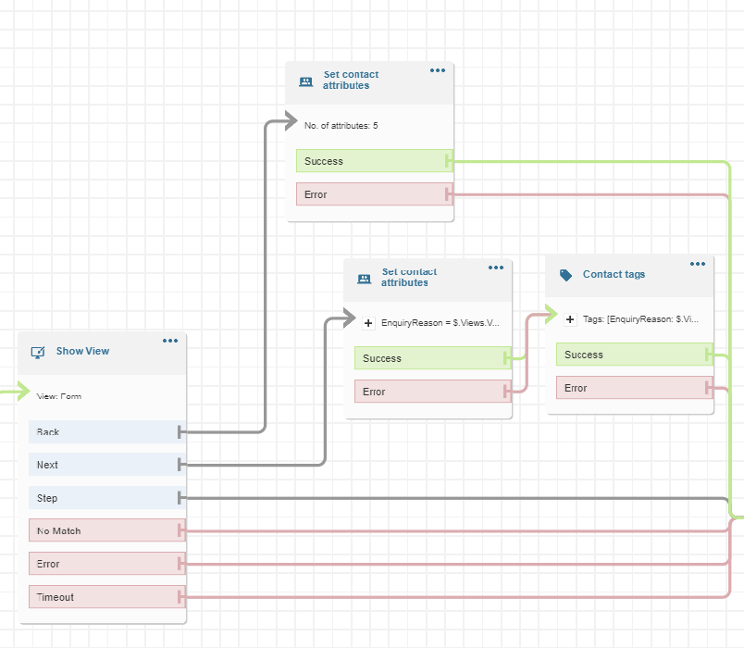
Connect the 'Next' path to a 'Set Contact Attributes' block that sets an attribute 'EnquiryReason' to the value selected from the dropdown menu. The notation for this is $.Views.ViewResultData.FormData.EnquiryReason.0
I have connected the Cancel/Back path to a ‘Set Contact Attributes’ block that will reset the property details attributes, so as not to surface the wrong property to the agent.
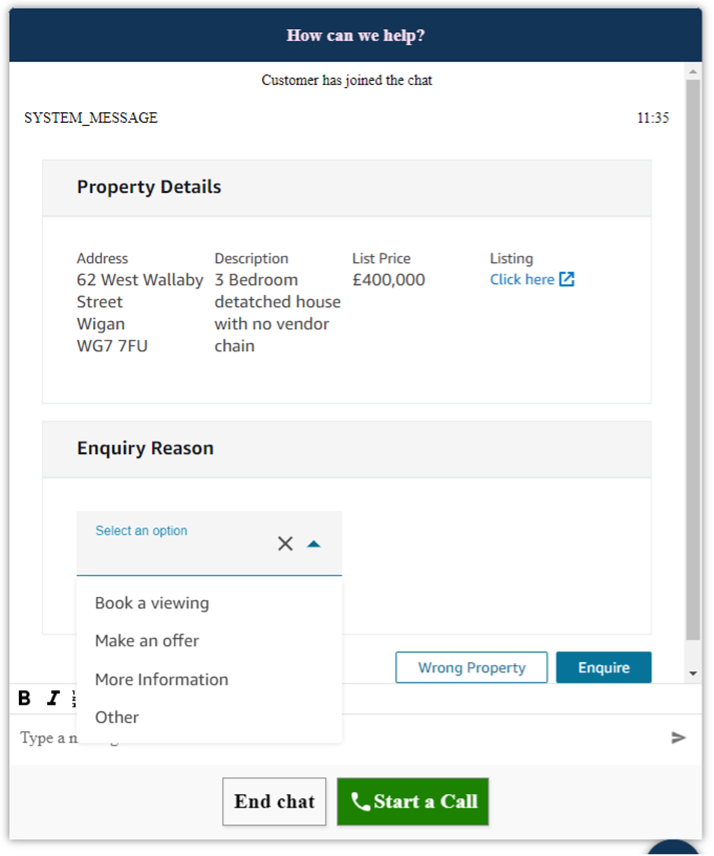
Now when a customer scans a QR Code and opens the communications widget, the first thing that they see is the below:
Agent Integration:
Create a new Contact Flow, of standard flow type – this will be used as an Event Flow. Add a 'Show View' block to this flow, using the 'Detail' View type.
Connect all outputs to a disconnect block for simplicity.
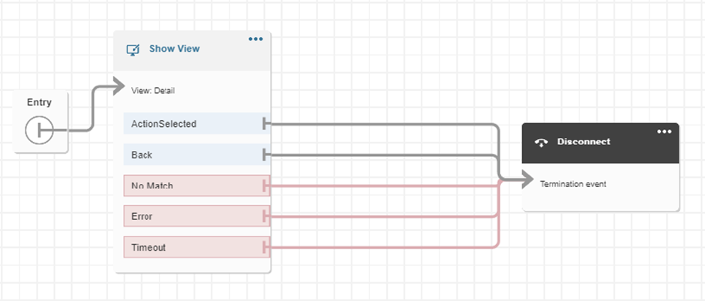
Configure the sections field to surface property details to the agent, as well as customer details.
[
    {
       "Heading":"Property Details",
       "Type":"DataSection",
       "Items":[
          {
             "Label":"Address",
             "Value":"$.Attributes.address"
          },
          {
             "Label":"Description",
             "Value":"$.Attributes.description"
          },
          {
             "Label":"List Price",
             "Value":"$.Attributes.list_price"
          },
          {
             "Label":"Listing",
             "Value":"Click here",
             "LinkType":"external",
             "Url":"$.Attributes.listing_url"
          },
          {
             "Label":"Seller First Name",
             "Value":"$.Attributes.seller_first_name"
          },
          {
             "Label":"Seller Last Name",
             "Value":"$.Attributes.seller_last_name"
          }
       ]
    },
    {
       "Heading":"Customer Details",
       "Items":[
             "Label":"Enquiry Reason",
             "Value":"$.Attributes.EnquiryReason"
          }
       ]
    }
 ]
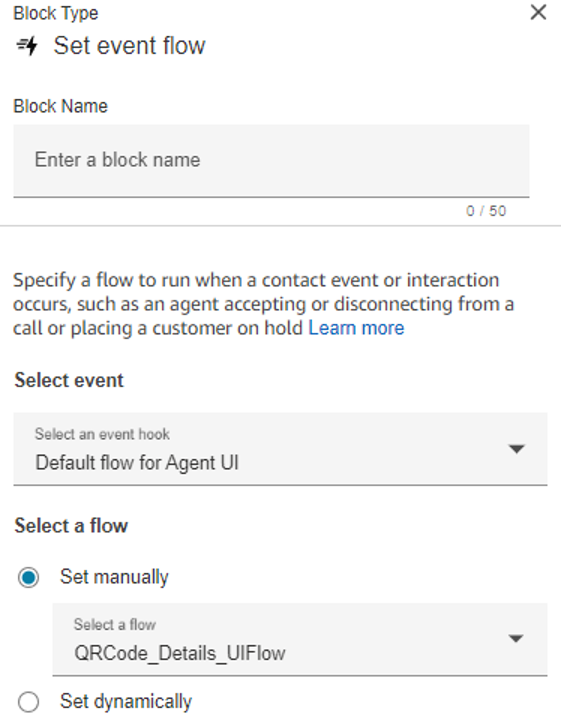
Publish the flow and return to your inbound chat flow. Add a 'Set event flow' block just before routing the customer to a queue. Configure it to use the newly created event flow as the default flow for the Agent UI.
With these configurations, when a contact is initiated and the property details are confirmed with an enquiry reason, the agent will receive the details when connected. The agent workspace displays relevant information about the property and the customer's enquiry reason, facilitating more efficient interactions.
What if we wanted to also capture the customer’s name before connecting them?
In your inbound chat flow, lets create another Show View block, so that we can ask their name after they’ve checked the property details.
Add that block in just before you route the customer to a queue.
In the Sections field, we’re going to add:
[
    {
       "Heading":"Please tell us your name",
       "Type":"FormSection",
       "Items":[
          {
             "Type":"FormInput",
             "Label":"Type your name",
             "Name":"CustomerName",
             "Required": true
            }
       ]
    }
 ]
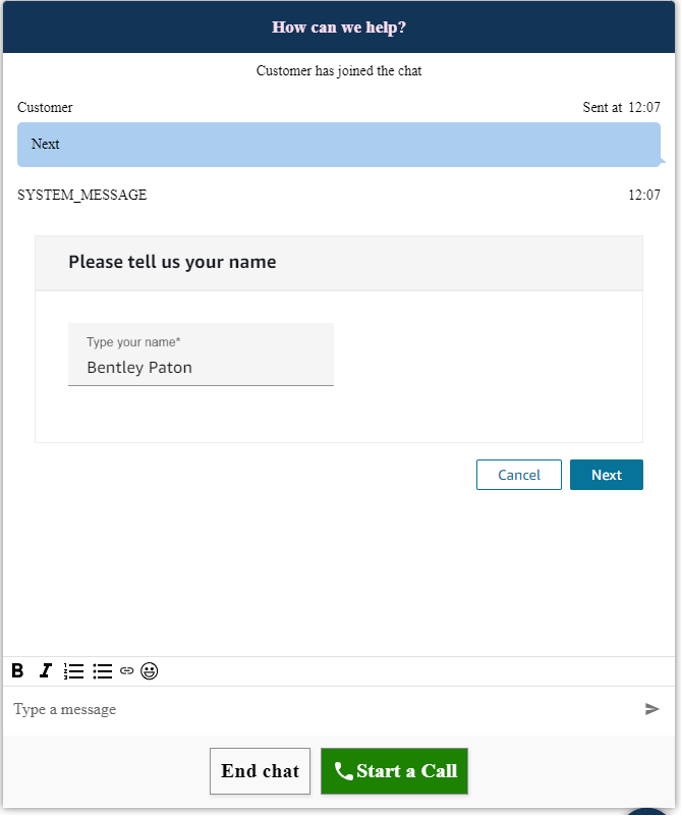
Now after checking the property details, you should see a form asking the customer for their name.
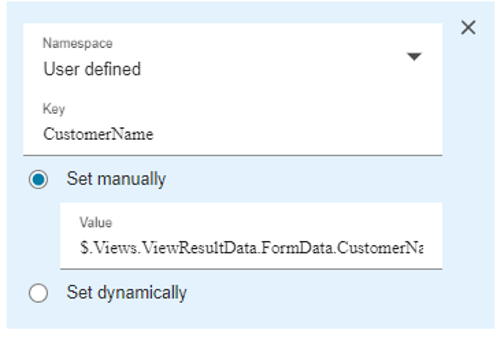
We can then add a ‘Set Contact Attributes’ block after the Show View – to set the Attribute ‘CustomerName’ to $.Views.ViewResultData.FormData.CustomerName
Then to pull that through to the Agents view, we can go to the Event Flow –
And add the following to the ‘Customer Details’ list in the Sections field.
     {
            "Label":"Customer Name",
            "Value":"$.Attributes.CustomerName"
         }
When the call is connected to an Agent, they will now see the Customer Name as well as the enquiry reason, allowing the Agent to greet by name for a more personal touch.
For further customization, you can add additional UI components, such as a Date Picker, to allow customers to select dates for booking viewings. Utilize the AWS Documentation and UI Component Viewer (https://d3irlmavjxd3d8.cloudfront.net/?path=/story/overview--page) to build bespoke views tailored to your specific needs.
By leveraging context and step-by-step guides in Amazon Connect, you can significantly enhance the customer and agent experience, leading to improved satisfaction and efficiency in communication processes.
For more information, or to request a demonstration, you can reach out on bentley.paton@cloudinteract.io – or head to https://cloudinteract.io.
Bentley Paton
Platform Engineer at CloudInteract
.svg)
.svg)

Want to know more?
See our other articles
Mastering Amazon Connect Billing: Subscription vs. Consumption-Based Models
When navigating Amazon Connect’s billing models, it’s crucial to understand the difference between subscription and consumption-based pricing.
Streamlining Operations during a Complex Divestiture with Advanced Contact Centre and Workplace Solutions
Our customer, a global leader in clinical research, was faced with an immense challenge following its recent divestiture from its parent company.
Reimagine the Future of your Contact Centre – Webinar Recap
Unlock the potential of modern contact centres with Amazon Connect and Cloudnteract. Learn best practices, AI strategies, and actionable steps from industry experts in our webinar recap.

SIGN UP FOR OUR EMAILS
Website Design by Global Exposure
